| What will we cover? |
|---|
|
In this topic we will look at the role of the Operating System (OS) and how we can access the OS from Python.
Most computer users know that their computer has an operating system, whether it be Windows, Linux or MacOS or some other variety. But not so many know exactly what the operating system does. This is compounded by the fact that most commercial operating systems come bundled with lots of extra programs that are not really part of the operating system per se, but without which the computer would not be very usable. Examples of these extras are image viewers, web browsers, text editors and so forth. So what exactly is the operating system and why do we need one?
The answer lies in the way computers are built. We can think of them as a layer cake with the computer hardware, the electronics, at the bottom. The hardware includes the Central Processing Unit (CPU or just the chip), the hard disk, the memory, the Input/Output subsystem (usually abbreviated to IO - pronounced Eye-Oh) including things like Serial and Parallel ports, USB ports, Network connections and so on.
The next layer up is the Basic Input Output System or BIOS. The BIOS is the first layer of software and is responsible for booting up the computer and providing a very raw interface to the hardware. For example it allows the hard disk heads to be moved from track to track and sector to sector within a track, and to read or write individual bytes to the hardware data buffers attached to each port. The BIOS knows nothing about files or directories or any of the other higher level concepts that we as users are so familiar with. It only knows how to manipulate the basic electronic devices from which the computer is assembled. In fact in some cases it does this by allowing hardware vendors to install their own software at critical places within the BIOS - so for example graphics card vendors install links to their own graphics drivers at a standard location in the BIOS code so that the BIOS simply calls an agreed interface but the vendors provide their own customized software.
The next layer up from the BIOS is where we hit the operating system proper. The structure of this layer depends a lot on the operating system but generally it comprises a kernel or core set of services with associated device drivers. The device drivers may be built into the kernel or they may be modules loaded by the kernel as needed - very similar to the way Python's modules get loaded by programs as they are needed. What this layer does is translates from the low-level hardware to the logical structures that we recognize and use, like files and folders.
As an example consider what happens when we open and read a file in Python:
The final layer in the cake is the shell which is the user environment. On modern operating systems this is usually presented as a Graphical User Interface.
If that all sounds pretty complicated that's because it is! The good news is that the reason we have an operating system is to save us mere mortal programmers from having to think about it, we just call open() and read().
However the operating system does more than simply control access to the hardware, it also provides the ability to launch a program. In fact it provides the mechanisms for managing all of the programs that run concurrently on your computer. The reason it needs to do this is that usually there are far fewer CPUs than there are programs so, to produce the illusion of all these programs running at the same time, what happens is that the operating system switches between them very quickly, giving each program a share of the CPU - a technique known as time-slicing. Some operating systems are better at this than others, for example early Windows and MacOS operating systems could only multi-task in this way with cooperation from the programs being run. If an errant program failed to provide a suitable pause point the computer would appear to lock up!
Most modern operating systems use a system called pre-emptive multi-tasking whereby the operating system interrupts programs regardless of what they are doing and automatically gives the next program access to the CPU. Various algorithms are used to improve the efficiency of this process, depending on the operating system. Common examples are - round robin, most recently used, least recently used, and there are several others. Again, from a programmer's point of view we can usually just ignore all this and pretend there really are multiple parallel programs running.
The final aspect of the operating system that I'm going to mention is the control of Users. Most modern computers can at least allow several different users to access the machine, each with their own files, desktop settings etc. Several operating systems go one step further and allow several users to be logged in at the same time, this is sometimes called multi-session operation. However with many users comes the issue of security, it's important that John can't see Janet's data and vice versa. The operating system is responsible for ensuring that each user's files are securely protected and only those with the appropriate authority can access data.
Since the operating system's job is to abstract away all these details you may be wondering why we as programmers should be interested in it at all, apart from academic curiosity, perhaps? The answer is that sometimes we need to interact with the hardware in ways that the standard programming functions don't allow, or maybe we need to launch another program from within our own. At other times we may want to control the computer in the same way a user would from within our programs. To do any of these things we need to get access to the underlying operating system facilities.
Python provides a number of modules for interacting with the operating system. The most important is called the os module and it tries to provide a common interface to any operating system by loading other lower level modules under the covers. The end result is that you can call the functions defined in the os module but some operating systems will behave slightly differently depending on the way they implement those functions internally. This doesn't normally present a problem, but if you do encounter strange behaviour from the os functions check the documentation to see if there are any restrictions on your operating system implementation.
The other operating system modules that we will consider are shutil, which provides user level control of files and folders to programmers. Also os.path and glob both of which provide facilities for navigating the computer file system. In fact that's the part we will look at first.
We've already covered handling files earlier in the tutorial, so what can the operating system help us do that we can't already? Well for one thing we can delete files, the standard file methods allow us to create them and to modify them but not delete them. Also we can search for files. open() is great if you know where the file lives but if you don't how can you find it? Extending that idea what about handling groups of files - let's say you want to manipulate all of the image files in a folder. And finally what about finer grained control of what we read from a file? The standard methods read either a single line or the whole file, but what if we only want a few bytes? All of these things are possible using the OS functions.
The first module I want to look at for finding files is called glob and it's used to get lists of filenames. The bizarre name comes from Unix where the term has been used for a long time to describe the act of selecting groups of files using wildcard characters. I have absolutely no idea where it originated and if anyone knows please send me an email!
The module itself is quite easy to use. After you import it (of course!) you find that there is only a single function glob()! You pass in a pattern to match and the function returns a list of matching filenames - what could be easier? Here is an example:
import glob
files = glob.glob("*.exe")
print files
And you get a list of the executable files in the current directory. Which begs the question how do we know what the current directory is? And can we change it? Of course we can - by using the os module!
import os
print os.getcwd() #cwd=current working directory
os.chdir("C:/WINDOWS")
print os.getcwd()
print os.listdir('.')  # finally get listing of cwd
Note that forward slashes (/) can be used in path names to avoid having to double up the back slash (\\) escape character normally used by Windows and MS DOS. The slash also works on MacOS so it can be considered a universal path separator which is very convenient! If you do need to be OS specific there is a variable os.sep that tells you the current OS setting.
So now we know how to look for a file in the current directory and how to change the current directory to the one we want. But that still makes searching for a specific file a tedious exercise. To help in that we can use the very powerful os.walk() function.
We will look at an example of os.walk being used to find a specific file located somewhere under a starting point. We'll create a findfile function that we can use in our programs.
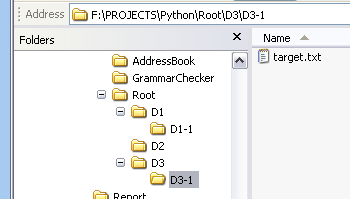
First I create a test environment consisting a hierarchy of folders under a root directory. In each folder I've placed some files and in one of the folders the one I want to search for, which I've called target.txt. You can see this structure in this screenshot of Windows Explorer:
The os.walk function takes a starting point as a parameter and returns a generator (kind of a virtual list that builds itself as required) consisting of tuples with 3 members (sometimes called a 3-tuple), the root, a list of directories in the current root and a list of the current files. If we look at the hierarchy I have created we would expect the first such tuple to look like this:
( 'Root', ['D1','D2','D3'], ['FA.txt','FB.txt'])
We can check that easily by writing a for loop at the interactive prompt:
>>> for t in os.walk('Root'):
...    print t
...
('Root', ['D1', 'D2', 'D3'], ['FA.txt', 'FB.txt'])
('Root/D1', ['D1-1'], ['FC.txt'])
('Root/D1/D1-1', [], ['FF.txt'])
('Root/D2', [], ['FD.txt'])
('Root/D3', ['D3-1'], ['FE.txt'])
('Root/D3/D3-1', [], ['target.txt'])
>>>
This clearly shows the path taken by os.walk. It also shows how we can find a file and construct its full path by looking in the files element of the tuples returned by os.walk and combining the name once we've found it with the root value of the containing tuple.
By writing our function to use regular expressions and to return a list we can create a function that is much more powerful (but also slower!) than the simple glob.glob that we looked at earlier. Let's have a go, it should look like this:
# findfile.py module containing only one function,
# findfile(), based on the use of os.walk()

import os,re

def findfile(filepattern, base = '.'):
    regex = re.compile(filepattern)
    matches = []
    for root,dirs,files in os.walk(base):
        for f in files:
          if regex.match(f):
             matches.append(root + '/' + f)
    return matches
And we can test it out at the interactive prompt like this:
>>> import findfile
>>> findfile.findfile('t.*','Root')
['Root/D3/D3-1/target.txt']
>>> findfile.findfile('F.*','Root')
['Root/FA.txt', 'Root/FB.txt', 'Root/D1/FC.txt', 'Root/D1/D1-1/FF.txt', 'Root/D2
/FD.txt', 'Root/D3/FE.txt']
>>> findfile.findfile('.*\.txt','Root')
['Root/FA.txt', 'Root/FB.txt', 'Root/D1/FC.txt', 'Root/D1/D1-1/FF.txt', 'Root/D2
/FD.txt', 'Root/D3/FE.txt', 'Root/D3/D3-1/target.txt']
>>> findfile.findfile('D.*','Root')
[]
So it works, and notice in the last example that it only works for files because the directory names are in the dirs lists which we didn't check. As an exercise try adding a new function to the findfiles module called finddir() that searches for directories matching a given regular expression. Then combine both to create a third function findall() that searches both files and directories.
We discussed in the Handling Files topic how to copy a file by reading it and then writing it out to a new location. However it's possible to use the operating system to do this work for us with a single statement! In Python we use the shutil module for this kind of work. shutil has several useful functions but the ones we will look at are (summarizing the Python module documentation):
Copy the file src to the file or directory dst. If dst is a directory, a file with the same basename as src is created (or overwritten) in the directory specified. Permission bits are copied. src and dst are path names given as strings.
Recursively move a file or directory to another
location.
If the destination is on our current filesystem, then simply use rename src. Otherwise, copy src to the dst and then remove src.
And, perhaps strangely, the following functions from the os module rather than shutil:
Remove the file path.
If path is a directory, OSError is raised; (see rmdir() to remove a directory).
Rename the file or directory src to
dst.
If dst is a directory, OSError will be raised.
The easiest way to see these in action is simply to try them out at the interactive prompt, using the directory/file structure I constructed for the os.walk example above:
>>> import os
>>> import shutil as sh
>>> import glob as g
>>> os.chdir('Root')
>>> os.listdir('.')
['D1', 'D2', 'D3', 'FA.txt', 'FB.txt']

>>> sh.copy('FA.txt', 'CA.txt')
>>> os.listdir('.')
['CA.txt', 'D1', 'D2', 'D3', 'FA.txt', 'FB.txt']

>>> sh.move('FB.txt','CB.txt')
>>> os.listdir('.')
['CA.txt', 'CB.txt', 'D1', 'D2', 'D3', 'FA.txt']

>>> os.remove('FA.txt')
>>> os.listdir('.')
['CA.txt', 'CB.txt', 'D1', 'D2', 'D3']

>>> for f in g.glob('*.txt'):
...    newname = f.replace('C','F')
...    os.rename(f,newname)
...
>>> os.listdir('.')
['D1', 'D2', 'D3', 'FA.txt', 'FB.txt']
>>>
>>>
In the examples we moved and copied the files, deleted the remaining original file then used rename to restore the folder back to its original state. These are all operations a user might do at a command prompt or in a file browser but here we have done them using Python. Note also the use of a for loop to do multiple changes. Obviously we could have added all manner of checks and rules within the loop, giving the potential to create some very powerful file manipulation tools. And of course, by saving the code as a script, we could perform these changes as often as we wished by simply running the script.
Often when dealing with files we need to know something about the characteristics of the files in question. For example when reading a directory listing, from glob say, is the "file" in question really a file, or is it a directory? Also it might be useful to find out when it was last modified, or even to monitor it to see if it is being regularly modified - thus indicating that another user or program is accessing the file. We might similarly want to monitor the size of a file to see if it's growing.
We can do all of these things using OS features from our programs. First of all we'll see how to check what kind of thing we are dealing with:
import os.path as p
import glob
for item in glob.glob('*')
   if p.isfile(item): print item, ' is a file'
   elif p.isdir(item): print item, ' is a directory'
   else: print item, ' is of unknown type'
Note that the test functions are found in the os.path module. Also note that there are several other tests available which you can read about in the os.path module documentation.
The next characteristic of a file that we will look at is its age. There are a number of interesting dates in a files lifeline, the first of which is its creation date, the next its more recent modification date and finally the date of the last access. Not all operating systems store all of the dates but most will provide creation and modification dates. In Python the creation and modification dates can be reached through the os.path module using the ctime() and mtime() functions respectively.
We'll take a look at some of the files in our Root structure. They were all created at nearly the same times but the top level files will be slightly different because we manipulated them in our earlier example using rename().
>>> import time as t
>>> os.listdir('.')
>>> for r,d,files in os.walk('.'):
...   for f in files:
...     print f,' created: %s:%s:%s' % t.localtime(p.getctime(r+'/'+f))[3:6]
...     print f,' modified: %s:%s:%s' % t.localtime(p.getmtime(r+'/'+f))[3:6]
...
FA.txt  created: 13:42:11
FA.txt  modified: 13:36:27
FB.txt  created: 13:42:11
FB.txt  modified: 17:32:5
FC.txt  created: 17:32:46
FC.txt  modified: 17:32:5
FF.txt  created: 17:34:3
FF.txt  modified: 17:32:5
FD.txt  created: 17:33:12
FD.txt  modified: 17:32:5
FE.txt  created: 17:33:53
FE.txt  modified: 17:32:5
target.txt  created: 17:34:28
target.txt  modified: 17:32:5
>>>
Notice the slightly bizarre result for FA and FB? It appears they were created after they were modified! That's because we created them as copies of the original files, then we deleted the originals and renamed the copies. The OS recognizes that the contents didn't change so shows the original copy time as the modification time but sees the rename operation as the creation time for the current file names!
There is a useful OS function that can return most of the information we ever need about a file in a single tuple. It's called stat() and there are several variants available, however we will only look at the version found in the os module.
os.stat() returns a tuple containing:
Note that there may occasionally be some extra fields depending on what the underlying operating system supports. Check the documentation for your platform.
Here is a simple example applied to our top level file FA.txt:
>>> fmtString = "protection: %s\nsize: %s\naccessed: %s\ncreated: %s"
>>> stats = os.stat('FA.txt')
>>> print fmString % stats[0],stats[6],stats[7],stats[9]
protection: 33279
size: 0
access: 1132407387
created: 1132407731
Notice that apart from size, which is simply the number of bytes in the file, all the other values need a bit of decoding to make them human readable. We'll look at how to work with each of them. The timestamps are easy since the numbers are just the number of seconds from the epoch - we covered that earlier in the tutorial - and we can use the time module functions (as we did with localtime() above) to convert to a meaningful data structure or string. The protection format needs to be decoded and the decoding is done using some special values found in the stat module. However we also need to use some operators, known as bitwise operators, which we haven't discussed yet. If you haven't come across these before read through the material in the box below before continuing.
Bitwise Operators and FlagsThe stat module contains a set of predefined constants - ie variables with a value which is not intended to be changed. There constants allow us to decode the permissions data using bitwise operators. The bitwise operators are the same as the boolean logical operators we have used before: and, or, not and one new one xor. The difference is that, as the name suggests, these versions operate on the individual binary bits of data rather than the overall value. The values in stat can be found by looking at the defined variables as binary values. Unfortunately Python does not provide a built-in binary format option so we need to write a short conversion function, which relies on the fact that each digit of an octal number converts directly to its binary representation and there is a built-in octal conversion. The bin(n) function looks like this:
def bin(n):
   digits = {'0':'000','1':'001','2':'010','3':'011',
             '4':'100','5':'101','6':'110','7':'111'}
   octStr = "%o" % n # convert to octal string
   binStr = ''
   # convert octal digit to its binary equivalent
   for c in octStr: binStr += digits[c]
   return binStr
The Bitwise OperatorsNow we will look at how the bitwise operators work using our
bin function to display input and output values. First let's look at the effect of a bitwise and which has the symbol & >>> print bin(5) 101 >>> print bin(1) 001 >>> print bin(2) 010 >>> print bin(5 & 1) 001 >>> print (bin( 5 & 2) 000 Let's look at those results and think about what is happening. Recall that a logical and is true if, and only if, both values are true. Similarly a bitwise & is true (value 1) if two corresponding bits are true (value 1). So for 5 & 1 the right-most bit is one in both cases, so the result also has its rightmost bit set to one. For 5 & 2 there are no locations where both bits are ones, therefore the result is all zero. This behaviour leads to an exciting feature of bitwise and operations. By 'and'ing a binary value with a number containing a single binary digit set to one we can find out if the corresponding bit in the test value is also at one, if it is, we will get a non-zero result back. Let's look at an example. Lets assume we want to test if the
second bit in a number is set. We know from above that the value
with a single bit in the second position (counting from the
right!) is 2. Let's look at the test:</> TWOBIT = 2 for n in range(10): if n & TWOBIT: print n,' = ',bin(n) You should find that 2,3,6 and 7 all have their second bit set. We can do similar things with the bitwise or which is the | symbol, the bitwise not which is ~ (be careful though, this one can break our overly simplistic bin() function!). Play with these using the bin() function to display the bits input and the output. Hopefully you will see how the various operators work. Just remember to compare the values bit by bit. The final bitwise operator is the exclusive or or xor operator which has the symbol ^. The exclusive or is true if either one of the test values is true but not if both are true. This has some interesting results. For example any number xor'd with itself always results in zero! Similarly any number xor'd with a key will produce a result which, if it is then xor'd with the same key, will return the original result! This is very useful in cryptography. Let's look at a few examples before we return to the stat module and the business of finding permission values. >>> print bin(5 ^ 2) 111 >>> print bin(5^5) 000 >>> print bin((5^2)^2) 101 FlagsWhen a boolean value is used to store a piece of information the variable used is often called a flag - because a flag can be either raised or lowered (we'll ignore half mast!). Where we have many such values relating to a single entity it is common to use a single number to store the combined set of flags by using the individual data bits to represent each individual flag. These flag values can then be retrieved using the bitwise operators we have been discussing. In particular the bitwise and combined with a decoding value known as a mask which allows us to extract the specific bits we need. (Our TWOBIT value was a mask for extracting the second bit.) The stat module is essentially a set of predefined masks for examining the permissions flags returned by the os.stat() function. |
Now we will look at some of the stat values as binary numbers and see if we can work out how to use them.
>>> import stat
>>> dir(stat)
['ST_ATIME', 'ST_CTIME', 'ST_DEV', 'ST_GID', 'ST_INO', 'ST_MODE', 'ST_MTIME',
'ST_NLINK', 'ST_SIZE', 'ST_UID', 'S_ENFMT', 'S_IEXEC', 'S_IFBLK', 'S_IFCHR',
'S_IFDIR', 'S_IFIFO', 'S_IFLNK', 'S_IFMT', 'S_IFREG', 'S_IFSOCK', 'S_IMODE',
'S_IREAD', 'S_IRGRP', 'S_IROTH', 'S_IRUSR', 'S_IRWXG', 'S_IRWXO', 'S_IRWXU',
'S_ISBLK','S_ISCHR', 'S_ISDIR', 'S_ISFIFO', 'S_ISGID', 'S_ISLNK', 'S_ISREG',
'S_ISSOCK', 'S_ISUID', 'S_ISVTX', 'S_IWGRP', 'S_IWOTH', 'S_IWRITE', 'S_IWUSR',
'S_IXGRP', 'S_IXOTH', 'S_IXUSR', '__builtins__', '__doc__', '__file__',
'__name__']
>>> print bin(stat.S_IREAD)
100000000
>>> print bin(stat.S_IWRITE)
010000000
>>> print bin(stat.S_IEXEC)
001000000
The first thing to point out is that there are a lot of constants defined! The next thing to note is the three values we printed are the values for determining if a file can be read, written or executed respectively. Notice that each value has a single bit set, just like our TWOBIT value in the examples above. So we can use a bitwise and to find out the permissions of our file following a call to the os.stat() function! Like this:
import os, stat
permission = os.stat('FA.txt')[0]
if permission & stat.S_IREAD:
   print 'The file is readable'
if permission & stat.S_IWRITE:
   print 'The file is writeable'
if permission & stat.S_IEXEC:
   print 'The file is executable'
Those are usually the only permissions we care about, but if you need more, read the stat module documentation carefully then check your understanding by experimenting at the Python >>> prompt.
There is also a helper function, access(), in the os module that allows you to check the most common access permissions more easily. However, the bitmask approach described above covers more options, so can be used where access() would not be sufficient.
Having discovered what the permissions on a file are currently set to we can also use the os module to change those permissions to something more suitable. Python uses the Unix conventions for changing permissions whereby each file has a set of three flags (read, write, execute) for each of three user categories (owner, group and world). Thus there are a total of 9 flags per file. These are represented by nine bits. These bits make up the rightmost bits of the permissions flag returned by os.stat
To change the permissions we simply set the bits appropriately. To do this there is a convenience function in the os module called chmod(). This function takes as an argument a 9 bit number. To convert the 9 bit binary string to a real number we can use the built-in function int() and pass in a second argument representing base 2, like this:
>>> perm = '111101100' # rwxr--r--
>>> print int(perm,2)
492
Now we can use that decimal value to change the permissions of the file.
>>> os.chmod('FA.txt',492)
Or we could do it all in one step like this:
>>> os.chmod('FA.txt',int('111101100',2))
If you are familiar with octal numbers you will know that each octal digit represents three binary bits. Thus you can express permissions very conveniently as three octal digits. (You can see that in the bin function that we wrote above, it uses that fact to convert to binary representation). Regular Unix users are familiar with expressing permissions this way and you can use that in Python too, making our chmod call look like this:
>>> # must use a leading 0 to treat as octal
>>> os.chmod('FA.txt',0754)
All of the examples above do the same thing, they set the owners permissions to read, write and execute while setting the group to read and execute and the world rights to read only.
When developing a program it's common to have the data files in the same folder as the program files so that everything can find everything else. In a program that you will use more generally you cannot assume that the files will be in a known location so you may need to search for them - perhaps using glob or os.walk as described above.
Having found the file you need you will likely need to set the full path if you want to open the file or examine its attributes. Alternatively, given a full pathname you might want to deconstruct that to extract only the file name, or maybe the folder name to hold in a variable say. os.path provides the tools you need to do that.
Filenames in Python are considered to be made up of various parts. First there is an optional drive letter (non-Windows operating systems often do not have the concept of physical drives being part of a filename). This is followed by a sequence of folder names separated by some specified character (in Python you can use '/' and it will nearly always work, but some operating systems have their own particular variants). Finally we have the filename or basename which in turn will usually have some kind of file extension. Consider an example:
F:/PROJECTS/PYTHON/Root/FA.txt
This says that the file FA.txt is located in the Root folder which is in the PYTHON folder under the PROJECTS folder in the top level directory of the F: drive.
Given a full path name we can extract the basename, the extension or the folder sequence by using functions in the os.path module, like this:
>>> pth = F:/PROJECTS/PYTHON/Root/FA.txt
>>> stem, aFile = os.path.split(pth)
>>> print 'stem : ',stem, ' file = ',aFile
stem :  F:/PROJECTS/PYTHON/Root  file =  FA.txt

>>> # this only works on OS with drive concept, like Windows
>>> print os.path.splitdrive(pth)
('F:', '/PROJECTS/PYTHON/Root/FA.txt')

>>> print os.path.dirname(pth)
F:/PROJECTS/PYTHON/Root

>>> print os.path.basename(pth)
FA.txt

>>> print os.path.splitext(aFile)
('FA', '.txt')
and we can join it all together again...
>>> print os.path.join(stem,aFile)
F:/PROJECTS/PYTHON/Root/FA.txt
One thing to note about os.path.join is that it uses the official separator character for the OS. Thus if you want to build a path that is portable across platforms use os.path.join to do it rather than hard coding the path into your program.
Some of the os family of modules use a slightly different mechanism of file access to the one we are used to. This is known as a file descriptor and is more closely tied into the operating systems concept of a file than the file objects we have used up until now. The advantage of using a file descriptor over a file object is that we can access a suite of low-level file operations that enable us to gain greater control of the files and their data. It is possible to create a file descriptor from a file object and vice versa. However in general it's best not to try to mix the modes of operation within a single function or program. Either use file descriptors exclusively or file objects.
The file descriptor functions include all of the usual file operations that we are accustomed to such as open, read, write and close. The low-level routines are usually harder to use with more potential for getting things wrong. Therefore only use low-level access if you absolutely have to. In most cases using the standard file objects will be a better solution.
Under what circumstances might you need to use low-level file access? The standard operations use a concept known as buffered IO whereby data is held in storage areas known as buffers during read and write operations. Sometimes those buffers cause problems when accessing unusual hardware devices or performing time critical operations. In those cases low-level operations might be the answer, but if you are not sure why you are using them, then you probably shouldn't be!
Having given a huge caveat in the previous paragraph I'm now going to say that using the low-level routines is not really so difficult, it's just that there are a few gotchas that you need to avoid.
Let's start by performing the simple task of opening a text file, writing some data and closing it again. It looks like this:
>>> fname = 'F:/PROJECTS/PYTHON/Root/FL.txt'
>>> mode = os.O_CREAT | os.O_WRONLY # create and write
>>> access = 0777 # read/write/execute for all
>>> data = 'Test text to check that it worked'
>>> fd = os.open(fname, mode, access) # NB. os version not the builtin!
>>> length = os.write(fd, data)
>>> if length != len(data): print 'Amount of data written doesn't match the data!'
>>> os.close(fd)
And similarly we can read the data back from the file.
>>> mode = os.O_RDONLY # read only
>>> fd = os.open(fname,mode) # no access needed this time
>>> result = os.read(fd, length)
>>> print result
>>> os.close(fd)
Notice that the way we set the file access type is more complex here, we have to use a bitwise or operator to combine all of the necessary flags as provided by the os module. Secondly notice that we can provide an access level other than the default, this is one advantage over the standard file object methods. The octal number (octal because it is starting with a zero) is the same as that described above under the heading "Changing permissions of files". When reading the data we have to pass the length of data read, we can do this with the standard read too but for low-level access it's compulsory.
The actual data read and written is always a series of bytes. When dealing with ASCII character strings that's not a problem since each character takes up one byte but for other data types you will have to use the struct module as described in the File Handling topic.
One of the most common things we do as users of an operating system is execute programs. Usually we do this from within a GUI or via a command line shell, but it is also possible to launch programs from within another program. Sometimes launching a program and allowing it to run to completion is all we need to do, at other times we may need to provide input data or read the output back into our own program.
The technical term for this is called inter-process communication, or simply IPC and we will look at that much more closely in the next topic.
Process is a fancy computer science term for what most users call a running program. Thus we have an executable file on the computer and when we execute it, it starts running within its own memory space. It may be possible to start several instances of the same executable file, each of which takes up its own memory space and processes its own data. Each of these executing programs along with their associated operating environment is what is called a process.
We can see the processes running on our computer using tools provided by the operating system. If you are running Windows NT/2000 or XP you can start an application called the Task Manager by hitting Ctrl-Alt-Del. Look at the tab labeled Processes and you will see a long list of running processes. Some of the names you will recognize, others you won't because they are services started by Windows itself. Also you might notice that some applications start several processes - relational databases and web servers often do this. The Task Manager process view on my PC looks like this:

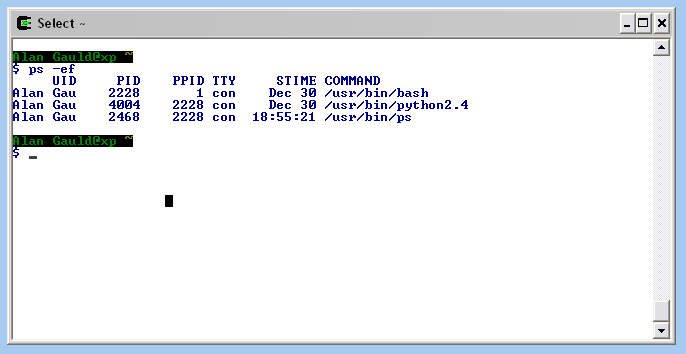
On Linux or MacOS you can use a Unix command called ps to list running processes. Running ps on my PC results in a screen like this:
The free internet encyclopedia Wikipedia gives useful and more complete definitions for the different terms program, process, and executable
So now we understand the difference between a program and a process let's see how we can execute a program from Python. The easiest way is to use the system() function from the os module. This simply executes a command string and returns an error code that reflects whether the command terminated correctly. There is no way of accessing the actual output of the invoked program, nor of providing input to the running process. As such, system() is best used for "fire and forget" execution of programs. For example, to clear a terminal screen we don't even need to know whether the command completed successfully, we don't need to interact with the command once it is underway. We can see an example of this, on a Unix type operating system below:
>>> import os
>>> errorcode = os.system("clear")
0
For MS DOS/Windows based operating systems the command is slightly different:
>>> errorcode = os.system("CLS")
0
But the result in both cases should be that the terminal window is cleared and the errorcode should be zero which indicates successful completion. This might not seem too useful but we can use system to good effect in our scripts where we only need to display the native output of the command or where we are only interested in the success or failure of the command. For example, we can find out if a file exists at a particular location on a Linux computer by invoking the ls command with the filename as an argument.
>>> filename = 'xxyyzz.ggh'
>>> errorcode = os.system('ls %s > /dev/null' % filename)
>>> if errorcode != 0: print filename, 'does not exist'
The example shows several techniques. First it shows a way of parameterizing system calls using string formatting. Secondly it shows how to suppress the output from being printed on the terminal by redirecting it to /dev/null (or perhaps to a temporary file where the OS does not support any kind of /dev/null concept). Finally, it shows us interpreting the errorcode to determine the result of the operation.
If the file exists the error code will be zero but if it doesn't then we will get a non-zero error value. Of course we saw above a more elegant way to do that check using native Python functions but the principle can often be used with other commands.
While system is very easy to use it is not particularly flexible and has no direct way of communicating any data back to our programs. We can fake this by capturing the output to a temporary text file and then opening that file and processing it as usual. But there is a better way of achieving the same result using another os module function called popen.
Note to Windows UsersThe following code examples all use the Unix ps command and will not work under Windows. In particular the commands module is not available for Windows so you can skip that part entirely. The other examples can be modified to work on Windows by substituting the command string for a valid Windows command such as "DIR /W". I will conclude this section with some Windows specific techniques for running processes. Unfortunately this is one area where interacting with the operating system is decidedly non-portable! |
In fact there are several variations of the popen command called popen, popen2, popen3 and popen4. The numbers refer to the various data stream combinations that are made available. The standard data streams were described in a sidebar in the Talking to the User topic. The basic version of popen simply creates a single data stream where all input/output is sent/received depending on a mode parameter passed to the function. In essence it tries to make executing a command look like using a file object.
By contrast, popen2 offers two streams, one for standard output and another for standard input, so we can send data to the process and read the output without closing the process. popen3 provides stderr access in addition to stdin/stdout. Finally there is popen4 that combines stderr and stdout into a single stream which appears very like normal console output. In Python 2.4 all of these popen calls have been superseded by a new Popen class found in a new subprocess module which we will look at later. For now we will only look at the standard os.popen() function, the others I will leave as a research exercise!
Let's consider how we can read the output of the ps command shown in the console output above. As I said earlier, popen tries to make a command look like a file, so we open the command with a read mode string and that gives us a file like object back. We can then apply file operations like readline, read etc. For non interactive programs like ps the simplest way is to let the program run and use read() to sweep up the entire output as a string. We can then use string.split() to separate the string into its individual lines. It looks like this:
import os
psout = os.popen('ps -ef', 'r')
results = psout.read().split('\n')
for line in results:
   print line
This gives us the same information that was displayed on screen, but now we can access the data and use Python's string manipulation features to extract whichever rows or fields we need. For example we could extract the process ID for the Python interpreter by finding the appropriate row and reading the 3rd field (or more usefully the 5th last field since the User ID here has potentially one or two words, and so working back is more likely to be accurate).
Let's try that:
for line in results:
   if 'python' in line:
       print 'The python pid is:', line.split()[-5]
       break
As you can see this is much more powerful than the use of system and its need to create temporary files etc.
We can also use popen to write to processes too, but this is relatively uncommon. There are other modules that often make this easier such as the telnet module. We will not consider writing to processes in this topic but if the need arises remember that popen is trying to make a process look like a file and the file can be opened for writing as well as reading.
More recent versions of Python have added modules and functions to try to simplify this kind of process interaction even more. We will look at some of these convenience functions now.
Python provides a module called commands which provides a slightly easier to use wrapper around popen on Unix based systems. The above example of extracting the pid from ps is repeated below using the commands module:
>>> import commands as c
>>> psout = c.getoutput('ps -ef').split('\n')
>>> for row in psout:
...   if 'python' in row:
...     print row.split()[-5]
...
3268
>>>
Notice that we need to split the string into rows and then split the rows into fields exactly as we did with popen, but this time we didn't need to explicitly read the output. Instead a single call to commands.getoutput executed the command and retrieved the result. Other functions in the module allow us to access the exit status too.
Another Python module introduced in version 2.4 is the subprocess module. This module is explicitly intended to replace all of the other mechanisms discussed above. Examples of how to use it are given in the module documentation but we will look at the basic usage here. The module is based upon a class called Popen - notice the capital first letter!
The Popen class can be used to create an instance of a command. Unfortunately the documentation is rather daunting since the Popen constructor has a great many parameters. The good news is that they nearly all have default values and can be ignored in the simplest cases. Thus to simply run an OS command from within a script we only need to do this:
import subprocess
p = subprocess.Popen('ps -ef', shell=True)
Notice the shell=True argument. This is necessary to get the command interpreted by the operating system command processor, or shell.
There is also a function called call that can be used as a replacement for os.system as in the above example:
subprocess.call('ps -ef', shell=True)
At this level call is almost identical to the Popen usage described above, but call does not have all of the options available to Popen and does not create any instances so uses slightly less system resources.
The equivalent to os.popen() is only slightly more complex.
import subprocess
psout = subprocess.Popen('ps -ef', shell=True, stdout=subprocess.PIPE).stdout
results = psout.read().split('\n')
for line in results:
   print line
Note: The main difference here is that instead of providing an 'r' mode string we specify that stdout should be a PIPE and then assign the stdout attribute of the Popen instance to psout. Having done that the rest of the code is unchanged from the previous examples.
The other os.popen variants can be simulated in much the same way by specifying which of the standard streams need to be represented as pipes. (A pipe is just a data connection to another process, in this case between our process and the command that we are executing) The valid values that can be assigned to the various streams include open files, file descriptors or other streams (so that stderr can be made to appear on stdout for example). The documentation shows how to replace each of the os.popen functions in more detail.
One big improvement using subprocess rather than the older functions is that the subprocess module raises an OSError exception if the requested command can not be found. The older functions generally left you with no clear indication of an error!
We will return to the use of subprocess and the concept of data pipes later in the inter-process communications topic.
There's a lot said about computer security these days and most of the facilities that ensure a secure environment are provided by the operating system. Just as other OS features are available through the OS API so we can access security features too, but with the important proviso that the operating system will still regulate our access to certain features according to the rights granted to the user who is running the program. So if we want to gain access to another users files we need to have that permission anyway, it's not an open invite to evade the built-in security of the system - at least it shouldn't be!
In this section we will take a look at some of the security related functions available, such as determining the user id, changing ownership of a file and finally using environment variables to find out about the current user's environment.
The first of these tasks, finding out the current user's ID, is done with the os.getuid function. The User ID is in the form of a number and converting that to a user name is slightly more complex but we rarely need to do that since we can usually get the user's name with the use of the getpass.getuser() function which simply looks at the various environment variables which might hold the information. We use it like this:
>>> import getpass
>>> print getpass.getuser()
The user ID is however the value that the program needs to modify security settings, so we obtain it like:
>>> import os
>>> print os.getuid()
Probably the most common use for this is to programmatically change the ownership of a file, perhaps one we created earlier as part of our program. For an example we will use one of the files we created earlier in this topic:
import os

os.chdir(r'F:\PROJECTS\Python\Root')
os.system('ls -l *.txt')
id = os.getuid()
os.chown('FA.txt',id,-1)
os.system('ls -l *.txt')
We use system() to display the directory listing before and after the call to chown() so that we can see any changes. We call chown() with the user ID that we obtain from getuid() and use -1 for the third parameter of chown() to indicate that we don't want to change the group ownership. (If we did there is also an os.getgid() function for fetching the group id). Note that the script will only have an effect if you run it as a different user from the current owner. Also that user must have permission to affect the change, so I recommend you log in as an administrator (or 'root').
Note that chown() does not tell you anything about the outcome so if you needed to check the result you would have to use something like stat to check the user id value before and after and thus check that the changes you expect have actually occurred.
In this section we look at the environment in which a process runs. When we start a program it inherits a whole memory context from the program which launches it, which is usually a users command line shell - either MS DOS or perhaps the Bash or Korn shells on Unix based systems. That environment includes lots of information about the system such as the users name, home directory, current directory, temporary directory, search paths etc. This means that by setting various environment variables each user can to some degree customize how the operating system works and even individual programs. For example Python takes heed of the PYTHONPATH environment variable when searching for modules. So two different users on the same computer could have different module search paths because they have each set up their own value for PYTHONPATH
Programmers can take advantage of this by defining some program specific environment variables that the user can set to override the normal program default values. For this to be effective we need to be able to read the current environment to find these values. To do this we can either read a single variable using the os.getenv() function or all of the currently set variables by looking at the os.environ variable which contains a dictionary of the name/value pairs.
We will first of all print all the environment variables, and you might be surprised to see how much information is available in this list:
>>> import os
>>> print os.environ
Thats it! It couldn't be much easier. Of course we could pretty it up a bit if we wanted to using the normal dictionary and string operations. However, in most cases it's much more useful to get at the value of the variables one at a time, which we do like this:
>>> os.getenv('PYTHONPATH')
This shows whether we have set our PYTHONPATH variable and if so, to what.
Typical usage of getenv() would be during initialization of a program when we set up things like the folder in which data files are found. In the following example we check to see where our address books should be stored, using a default of the current directory if no variable exists:
# ... other initialization steps here.
folder = os.getenv('PY_ADDRESSES', os.getcwd())
# ... rest of program here
Notice that if no value exists for the variable PY_ADDRESSES then getenv() returns its second argument which is our default location.
Normally the user would create and set such environment variables manually using the operating system. For example in Windows XP it's done via the
MyComputer->Properties->Advanced->Environment Variables
sequence of settings.
On Linux or MacOS it is done from a command prompt by using the export or setenv commands depending on the shell being used.
On some operating systems, but not all, it is possible to change the values of an existing environment variable. Be very careful if you do this since on some systems it can result in you overwriting other values. Also while some operating systems will mirror these changes back into the users environment in most cases the changes will only apply in the context of the writing process.
Thus if the OS supports it we could write our default folder value back to the users environment to ensure that other instances of our program use the same location.
# other code as above
putenv('PY_ADDRESSES', folder)
# ... carry on with the rest of the program
Some Unix environment variables are used by many programs, for example:
That's all I'll say about environments for now. We will touch on them again in a later topic but for now, if you are wondering how to get user-specific data remember to look and see if it's already there as an environment variable, or alternatively give the user the option of setting it via an environment variable specific to your program.
The os module and its friends contain far too much to cover in a single topic. In fact even the Python documentation takes several HTML pages to describe the os module alone and a page each for the other modules. Please explore the wealth of functionality provided. You will discover many weird and wonderful names in there. Many of these come from the Unix operating system and its API. The os module does its best to provide equivalent functionality on any operating system but if you want to find out more about what these functions do, often the best way is to read the Unix documentation. A good place to start, especially if you don't have a Unix/Linux system to hand, is with the O'Reilly book, Unix Systems Programming for SVR4.
And if this look at operating systems has whetted your appetite then a good general operating systems book is Fundamentals of Operating Systems by A.M. Lister. It's short and easy to read with many diagrams of the concepts. If you want to get closer to the code level then there is no better book than Andrew Tanenbaum's classic text: Operating Systems: Design And Implementation. This was the book that inspired Linus Torvalds to write his own operating system, which went on to become the phenomenon that is Linux!
| Points to remember |
|---|
|
If you have any questions or feedback on this page send me mail
at: alan.gauld@yahoo.co.uk