What will we cover?
In this topic we will look at the role of the Operating System (OS) and how we can access the OS from Python.
Most computer users know that their computer has an operating system, whether it be Windows, Linux or MacOS or some other variety. But not so many know exactly what the operating system does. This is compounded by the fact that most commercial operating systems come bundled with lots of extra programs that are not really part of the operating system per se, but without which the computer would not be very usable. Examples of these extras are image viewers, web browsers, text editors and so forth. So what exactly is the operating system and why do we need one?
The answer lies in the way computers are built. We can think of them as a layer cake with the computer hardware, the electronics, at the bottom. The hardware includes the Central Processing Unit (CPU), the hard disk, the memory, the Input/Output subsystem (usually abbreviated to IO - pronounced Eye-Oh) including things like USB ports, Card slots, Network connections and so on.
The next layer up is the Basic Input Output System or BIOS. The BIOS is the first layer of software and is responsible for booting up the computer and providing a very raw interface to the hardware. For example it allows the hard disk heads to be moved from track to track and sector to sector within a track, and to read or write individual bytes to the hardware data buffers attached to each port. The BIOS knows nothing about files or directories or any of the other higher level concepts that we as users are so familiar with. It only knows how to manipulate the basic electronic devices from which the computer is assembled. In fact in some cases it does this by allowing hardware vendors to install their own software at critical places within the BIOS - so, for example, graphics card vendors install links to their own graphics drivers at a standard location in the BIOS code so that the BIOS simply calls an agreed interface but the vendors provide their own customized software. The BIOS is usually stored in a special kind of memory chip that is is semi-permanent in nature. That is, it is not deleted when the power goes off but it can also be rewritten if necessary to update the BIOS
The next layer up from the BIOS is where we hit the operating system proper. The structure of this layer depends a lot on the individual operating system but generally it comprises a kernel or core set of services with associated device drivers. The device drivers may be built into the kernel or they may be modules loaded by the kernel as needed - very similar to the way Python's modules get loaded by programs as they are needed. What this layer does is translates from the low-level hardware to the logical structures that we recognize and use, like files and folders. One important point of note is that the same computer hardware and BIOS can run many different operating systems. Indeed, you can usually create a multi-boot configuration where you select which of several installed operating systems you want to start up in when the computer first starts up.
The penultimate layer in the cake is the shell which is the user environment. On modern operating systems this is usually presented as a Graphical User Interface although a command line of some kind is nearly always available too.
Finally, we have the user software layer. This comprises the suite of programs that are installed by the user (or perhaps pre-installed by the OS vendor). It include favourites like web browsers, email programs, word processors etc. It also includes programming tools like Python.
As an example of the interaction between these layers consider what happens when we open and read a file in Python:
If that all sounds pretty complicated that's because it is! The good news is that the reason we have an operating system is to save us mere mortal programmers from having to think about it, we just call open() and read().
However the operating system does more than simply control access to the hardware, it also provides the ability to launch a program. In fact it provides the mechanisms for managing all of the programs that run concurrently on your computer. The reason it needs to do this is that usually there are far fewer CPUs than there are programs so, to produce the illusion of all these programs running at the same time, what happens is that the operating system switches between them very quickly, giving each program a share of the CPU - a technique known as time-slicing. Some operating systems are better at this than others, for example early Windows and MacOS operating systems could only multi-task in this way with cooperation from the programs being run. If an errant program failed to provide a suitable pause point the computer would appear to lock up!
Most modern operating systems use a system called pre-emptive multi-tasking whereby the operating system interrupts programs regardless of what they are doing and automatically gives the next program access to the CPU. Various algorithms are used to improve the efficiency of this process, depending on the operating system. Common examples are: round robin, most recently used, least recently used, and there are several others. Again, from a programmer's point of view, we can usually just ignore all of this and pretend there really are multiple parallel programs running.
Modern computers nearly all come with multiple processors. These may be multiple physical silicon chips or multiple cores (which are like individual processors all built into a single chip). It is the operating system's job to allocate running processes to CPUs and cores to ensure optimal usage. Once again, as programmers, we don't need to think about this, we just let the operating system do its thing.
The final aspect of the operating system that I'm going to mention is the control of Users. Most modern computers can at least allow several different users to access the machine, each with their own files, desktop settings etc. Several operating systems go one step further and allow several users to be logged in at the same time, this is sometimes called multi-session operation. However, with many users comes the issue of security, it's important that John can't see Janet's data and vice versa (unless the user wants them to, of course). The operating system is responsible for ensuring that each user's files are securely protected and only those with the appropriate authority can access data.
Since the operating system's job is to abstract away all these details you may be wondering why we as programmers should be interested in it at all, apart from academic curiosity, perhaps? The answer is that sometimes we need to interact with the hardware in ways that the standard programming functions don't allow, or maybe we need to launch another program from within our own. At other times we may want to control the computer, in the same way a user would, from within our programs. To do any of these things we need to get access to the underlying operating system facilities.
Python provides a number of modules for interacting with the operating system. The most important is called the os module and it tries to provide a common interface to any operating system by loading other lower level modules under the covers. The end result is that you can call the functions defined in the os module but some operating systems will behave slightly differently depending on the way they implement those functions internally. This doesn't normally present a problem, but if you do encounter strange behaviour from the os functions check the documentation to see if there are any restrictions on your operating system implementation.
The other operating system modules that we will consider are shutil, which provides user level control of files and folders to programmers. Also os.path and glob both of which provide facilities for navigating the computer file system. In fact that's the part we will look at first.
Caveat: As already mentioned, operating systems are inherently different and so the examples below will mostly not work on Windows (you will need to work out what the equivalent Windows CMD commands are (where they exist) and substitute them for the Unix commands in the text). I apologize but duplicating every example twice would just be too messy. Those using Linux or MacOS X should find things work just fine provided you have the relevant programs installed (eg. not every Unix OS comes with ex installed by default).
We've already covered handling files earlier in the tutorial, so what can the operating system help us do that we can't already? Well for one thing we can delete files, the standard file methods allow us to create them and to modify them but not delete them. Also we can search for files. open() is great if you know where the file lives but if you don't, how can you find it? Extending that idea what about handling groups of files - let's say you want to manipulate all of the image files in a folder. And finally what about finer grained control of what we read from a file? The standard methods read either a single line or the whole file, but what if we only want a few bytes? All of these things are possible using the OS functions.
The first module I want to look at for finding files is called glob and it's used to get lists of filenames. The rather bizarre name comes from Unix where the term has been used for a long time to describe the act of selecting groups of files using wildcard characters. (The name harks back to an early OS command that did the expansion and was short for global.)
The module itself is quite easy to use. After you import it (of course!) you find that there is only a single function glob()! You pass in a pattern to match and the function returns a list of matching filenames - what could be easier? Here is an example:
import glob
files = glob.glob("*.txt")
print( files )
And you get a list of the text files in the current directory. Which begs the question how do we know what the current directory is? And can we change it? Of course we can - by using the os module!
import os
print( os.getcwd() )  #cwd=current working directory
os.chdir("/usr/local") #chdir=change working directory
print( os.getcwd() )
print( os.listdir('.') ) #get listing of new dir
So now we know how to look for a file in the current directory and how to change the current directory to the one we want. But that still makes searching for a specific file a tedious exercise. To help in that we can use the very powerful os.walk() function.
We will look at an example of os.walk being used to find a specific file located somewhere under a starting point. We'll create a findfile function that we can use in our programs.
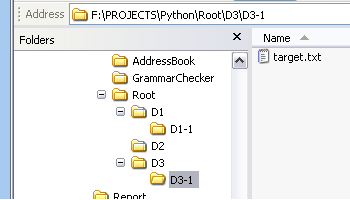
First I will create a test environment consisting a hierarchy of folders under a Root directory. In each folder I've placed some files and in one of the folders the one I want to search for, which I've called target.txt. You can see this structure in this screenshot of Windows Explorer:
The os.walk function takes a starting point as a parameter and returns a generator (kind of a virtual list that builds itself as required) consisting of tuples with 3 members (sometimes called a 3-tuple or triplet), the root, a list of directories in the current root and a list of the current files in that root folder. If we look at the hierarchy I have created we would expect the first such tuple to look like this:
( 'Root', ['D1','D2','D3'], ['FA.txt','FB.txt'] )
We can check that easily by writing a for loop at the interactive prompt:
>>> for t in os.walk('Root'):
...    print( t )
...
('Root', ['D1', 'D2', 'D3'], ['FA.txt', 'FB.txt'])
('Root/D1', ['D1-1'], ['FC.txt'])
('Root/D1/D1-1', [], ['FF.txt'])
('Root/D2', [], ['FD.txt'])
('Root/D3', ['D3-1'], ['FE.txt'])
('Root/D3/D3-1', [], ['target.txt'])
>>>
This clearly shows the path taken by os.walk. It also shows how we can find a file and construct its full path by looking in the files element of the tuples returned by os.walk and combining the name once we've found it with the root value of the containing tuple.
By writing our function to use regular expressions and to return a list we can create a function that is much more powerful (but also slower!) than the simple glob.glob that we looked at earlier. Let's have a go, it should look like this:
# findfile.py module containing only one function,
# find_file(), based on the use of os.walk()

import os,re

def find_file(filepattern, base = '.'):
    regex = re.compile(filepattern)
    matches = []
    for root,dirs,files in os.walk(base):
        for f in files:
          if regex.match(f):
             matches.append(root + '/' + f)
    return matches
Save it in a file called findfile.py and we can test it out at the interactive prompt like this:
>>> import findfile
>>> findfile.find_file('t.*','Root')
['Root/D3/D3-1/target.txt']
>>> findfile.find_file('F.*','Root')
['Root/FA.txt', 'Root/FB.txt', 'Root/D1/FC.txt', 'Root/D1/D1-1/FF.txt', 'Root/D2
/FD.txt', 'Root/D3/FE.txt']
>>> findfile.find_file('.*\.txt','Root')
['Root/FA.txt', 'Root/FB.txt', 'Root/D1/FC.txt', 'Root/D1/D1-1/FF.txt', 'Root/D2
/FD.txt', 'Root/D3/FE.txt', 'Root/D3/D3-1/target.txt']
>>> findfile.find_file('D.*','Root')
[]
Notice that the first argument to find_file()) is 't.*'. Remember that it is a regular expression not a filename wildcard such as you would use with glob. So it stands for a t followed by zero or more other characters, not just a file like t.txt.
The output shows that it works, and notice in the last example that it only works for files because the directory names are in the dirs lists which we didn't check. As an exercise try adding a new function to the findfile module called find_dir() that searches for directories matching a given regular expression. Then combine both to create a third function find_all() that searches both files and directories.
We discussed in the Handling Files topic how to copy a file by reading it and then writing it out to a new location. However it's possible to use the operating system to do this work for us with a single statement! In Python we use the shutil module for this kind of work. shutil has several useful functions but the ones we will look at are (summarizing the Python module documentation):
Copy the file src to the file or directory dst. If dst is a directory, a file with the same basename as src is created (or overwritten) in the directory specified. Permission bits are copied. src and dst are path names given as strings.
Recursively move a file or directory to another location.
If the destination is on our current filesystem, then simply rename src. Otherwise, copy src to the dst and then remove src.
And, perhaps strangely, the following functions from the os module rather than shutil:
Remove the file path.
If path is a directory, OSError is raised; (see rmdir() to remove a directory).
Rename the file or directory src to dst.
If dst is a directory, OSError will be raised.
The easiest way to see these in action is simply to try them out at the interactive prompt, using the directory/file structure I constructed for the os.walk example above:
>>> import os
>>> import shutil as sh
>>> import glob as g
>>> os.chdir('Root')
>>> os.listdir('.')
['D1', 'D2', 'D3', 'FA.txt', 'FB.txt']

>>> sh.copy('FA.txt', 'CA.txt')
>>> os.listdir('.')
['CA.txt', 'D1', 'D2', 'D3', 'FA.txt', 'FB.txt']

>>> sh.move('FB.txt','CB.txt')
>>> os.listdir('.')
['CA.txt', 'CB.txt', 'D1', 'D2', 'D3', 'FA.txt']

>>> os.remove('FA.txt')
>>> os.listdir('.')
['CA.txt', 'CB.txt', 'D1', 'D2', 'D3']

>>> for f in g.glob('*.txt'):
...    newname = f.replace('C','F')
...    os.rename(f,newname)
...
>>> os.listdir('.')
['D1', 'D2', 'D3', 'FA.txt', 'FB.txt']
>>>
>>>
In the examples we moved and copied the files, deleted the remaining original file then used rename to restore the folder back to its original state. These are all operations a user might do at a command prompt or in a file browser but here we have done them using Python. Note also the use of a for loop to do multiple changes. Obviously we could have added all manner of checks and rules within the loop, giving the potential to create some very powerful file manipulation tools. And of course, by typing the code into a script, we could perform these changes as often as we wished by simply running the script.
Often when dealing with files we need to know something about the characteristics of the files in question. For example when reading a directory listing, from glob say, is the "file" in question really a file, or is it a directory? Also it might be useful to find out when it was last modified, or even to monitor it to see if it is being regularly modified - thus indicating that another user or program is accessing the file. We might similarly want to monitor the size of a file to see if it's growing.
We can do all of these things using OS features from our programs. First of all we'll see how to check what kind of thing we are dealing with:
import os.path as p
import glob
for item in glob.glob('*')
   if p.isfile(item): print( item, ' is a file' )
   elif p.isdir(item): print( item, ' is a directory' )
   else: print( item, ' is of unknown type' )
Note that the test functions are found in the os.path module. Also note that there are several other tests available which you can read about in the os.path module documentation.
The next characteristic of a file that we will look at is its age. There are a number of interesting dates in a file's lifeline, the first of which is its creation date, the next its most recent modification date and finally the date of the last access. Not all operating systems store all of the dates but most will provide creation and modification dates. In Python the creation and modification dates can be reached through the os.path module using the ctime() and mtime() functions respectively.
We'll take a look at some of the files in our Root structure. They were all created at nearly the same times but the top level files will be slightly different because we manipulated them in our earlier example using rename().
>>> import time as t
>>> os.listdir('.')
>>> for r,d,files in os.walk('.'):
...   for f in files:
...     print( f,' created: %s:%s:%s' % t.localtime(p.getctime(r+'/'+f))[3:6] )
...     print( f,' modified: %s:%s:%s' % t.localtime(p.getmtime(r+'/'+f))[3:6])
...
FA.txt  created: 13:42:11
FA.txt  modified: 13:36:27
FB.txt  created: 13:42:11
FB.txt  modified: 17:32:5
FC.txt  created: 17:32:46
FC.txt  modified: 17:32:5
FF.txt  created: 17:34:3
FF.txt  modified: 17:32:5
FD.txt  created: 17:33:12
FD.txt  modified: 17:32:5
FE.txt  created: 17:33:53
FE.txt  modified: 17:32:5
target.txt  created: 17:34:28
target.txt  modified: 17:32:5
>>>
| Octal | Binary | "rwx" |
|---|---|---|
| 0 | 0b000 | "---" |
| 1 | 0b001 | "--x" |
| 2 | 0b010 | "-w-" |
| 3 | 0b011 | "-wx" |
| 4 | 0b100 | "r--" |
| 5 | 0b101 | "r-x" |
| 6 | 0b110 | "rw-" |
| 7 | 0b111 | "rwx" |
Regular Unix users are familiar with expressing permissions this way and you can use that in Python too, making our chmod call look like this:
>>> # must use a leading 0 to treat as octal
>>> os.chmod('FA.txt',0754)
Both of the examples above do the same thing, they set the owners permissions to read, write and execute while setting the group to read and execute and the world rights to read only. If you take the time to become familiar with the octal/binary conversions then the octal version is certainly easier to type!
When developing a program it's common to have the data files in the same folder as the program files so that everything can find everything else. In a program that you will use more generally you cannot assume that the files will be in a known location, so you may need to search for them - perhaps using glob or os.walk as described above.
Having found the file you need you will likely need to set the full path if you want to open the file or examine its attributes. Alternatively, given a full pathname you might want to de-construct it to extract only the file name, or maybe the folder name, to hold in a variable say. os.path provides the tools you need to do that.
Filenames in Python are considered to be made up of various parts. First there is an optional drive letter (non-Windows operating systems often do not have the concept of physical drives being part of a filename). This is followed by a sequence of folder names separated by some specified character (in Python you can use '/' and it will nearly always work, but some operating systems have their own particular variants). Finally we have the filename or basename which in turn will usually have some kind of file extension. Consider an example:
F:/PROJECTS/PYTHON/Root/FA.txt
This says that the file named 'FA.txt' is located in the Root folder, which is in the PYTHON folder, under the PROJECTS folder, in the top level directory of the F: drive. The file has an extension of '.txt'.
Given a full path name we can extract the basename, the extension, or the folder sequence by using functions in the os.path module, like this:
>>> pth = F:/PROJECTS/PYTHON/Root/FA.txt
>>> stem, aFile = os.path.split(pth)
>>> print( 'stem : ',stem, '\nfile : ',aFile )
stem :  F:/PROJECTS/PYTHON/Root
file :  FA.txt

>>> # this only works on OS with drive concept, like Windows
>>> print( os.path.splitdrive(pth) )
('F:', '/PROJECTS/PYTHON/Root/FA.txt')

>>> print( os.path.dirname(pth) )
F:/PROJECTS/PYTHON/Root

>>> print( os.path.basename(pth) )
FA.txt

>>> print( os.path.splitext(aFile) )
('FA', '.txt')
and we can join it all together again...
>>> print( os.path.join(stem,aFile) )
F:/PROJECTS/PYTHON/Root\\FA.txt
One thing to note about os.path.join is that it uses the official separator character for the OS. Thus if you want to build a path that is portable across platforms use os.path.join to do it rather than hard coding the path into your program. You can also specify as many path elements as you like in the arguments list. The previous example could have been done like this:
>>> print( os.path.join("F:\\", "PROJECTS", "PYTHON", "Root", "FA.txt"))
F:\\PROJECTS\\PYTHON\\Root\\FA.txt
Some of the os family of modules use a slightly different mechanism of file access to the one we are used to. This is known as a file descriptor and is more closely tied into the operating systems concept of a file than the file objects we have used up until now. The advantage of using a file descriptor over a file object is that we can access a suite of low-level file operations that enable us to gain greater control of the files and their data. It is possible to create a file descriptor from a file object and vice versa. However, in general it's best not to try to mix the modes of operation within a single function or program. Either use file descriptors exclusively or file objects.
The file descriptor functions include all of the usual file operations that we are accustomed to such as open, read, write and close. The low-level routines are usually harder to use with more potential for getting things wrong. Therefore only use low-level access if you absolutely have to. In most cases using the standard file objects will be a better solution.
Under what circumstances might you need to use low-level file access? The standard operations use a concept known as buffered IO whereby data is held in storage areas known as buffers during read and write operations. Sometimes those buffers cause problems when accessing unusual hardware devices or performing time critical operations. In those cases low-level operations might be the answer, but if you are not sure why you are using them, then you probably shouldn't be!
Having given a huge caveat in the previous paragraph I'm now going to say that using the low-level routines is not really so difficult, it's just that there are a few gotchas that you need to avoid.
Let's start by performing the simple task of opening a text file, writing some data and closing it again. It looks like this:
fname = 'F:/PROJECTS/PYTHON/Root/FL.txt'
mode = os.O_CREAT | os.O_WRONLY # create and write
access = 0777 # read/write/execute for all
data = 'Test text to check that it worked'
fd = os.open(fname, mode, access) # NB. os version not the builtin!
length = os.write(fd, data)
if length != len(data):
   print( 'Amount of data written doesn't match the data!' )
os.close(fd)
And similarly we can read the data back from the file.
mode = os.O_RDONLY # read only
fd = os.open(fname,mode) # no access needed this time
result = os.read(fd, length)
print( result )
os.close(fd)
Notice that the way we set the file access type is more complex here, we have to use a bitwise or operator to combine all of the necessary flags as provided by the os module. Secondly, notice that we can provide an access level other than the default, this is one advantage over the standard file object methods. The octal number (octal because it is starting with a zero) is the same as that described above under the heading "Changing permissions of files". When reading the data we have to pass the length of data read, we can choose to do this with the standard read too, but for low-level access it's compulsory.
The actual data read and written is always a bytestring. When dealing with character strings that's not a problem since we can use the usual unicode decode method to convert the bytes to characters but for other data types you will have to use the struct module as described in the File Handling topic.
One of the most common things we do as users of an operating system is execute programs. Usually we do this from within a GUI or via a command line shell, but it is also possible to launch programs from within another program. Sometimes launching a program and allowing it to run to completion is all we need to do, at other times we may need to provide input data or read the output back into our own program.
The technical term for this is called inter-process communication, or simply IPC and we will look at that much more closely in the next topic.
Process is a fancy computer science term for what most users call a running program. Thus we have an executable file on the computer and when we execute it, it starts running within its own memory space. It may be possible to start several instances of the same executable file, each of which takes up its own memory space and manages its own data. Each of these executing programs along with their associated operating environment is what is called a process.
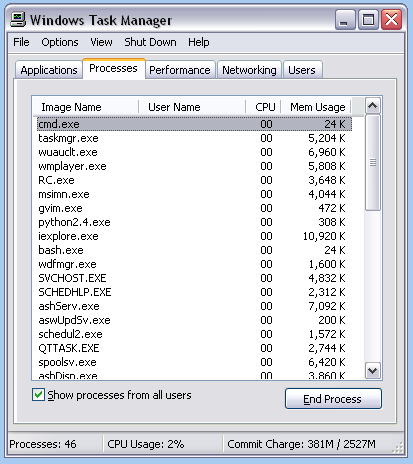
We can see the processes running on our computer using tools provided by the operating system. If you are running Windows you can start an application called the Task Manager by hitting Ctrl-Alt-Del. Look at the tab labelled Processes and you will see a long list of running processes. Some of the names you will recognize, others you won't because they are services started by Windows itself. Also you might notice that some applications start several processes - relational databases and web servers often do this. The Task Manager process view on my PC looks like this:
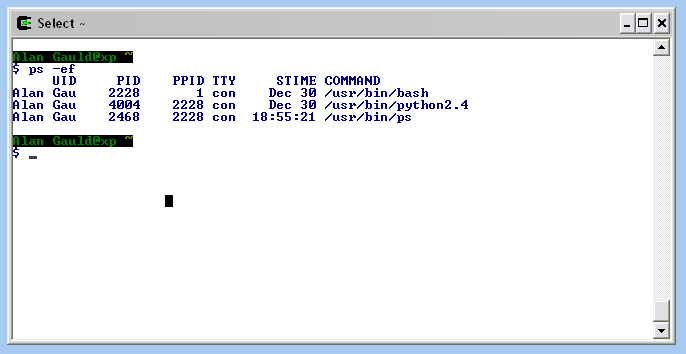
On Linux or MacOS you can use a Unix command called ps (or another called top which gives a continuous live display) to list running processes (or Tasks). Running ps on my Linux PC results in a screen like this:
The free internet encyclopedia Wikipedia gives useful and more complete definitions for the different terms program, process, and executable
So now we understand the difference between a program and a process let's see how we can execute a program from Python. It turns out that for historical reasons there are a multitude of ways to achieve this. We will look at two of them, the first is very simple to use but quite limited, as you will see. The second is the recommended approach nowadays and is much more powerful and flexible.
The oldest and easiest way is to use the system() function from the os module. This simply executes a command string and returns an error code that reflects whether the command terminated correctly. There is no way of accessing the actual output of the invoked program, nor of providing input to the running process. As such, system() is best used for "fire and forget" execution of programs. For example, to clear a terminal screen we don't even need to know whether the command completed successfully, we don't need to interact with the command once it is underway. We can see an example of this, on a Unix type operating system below:
>>> import os
>>> errorcode = os.system("clear")
>>> print( errorcode )
0
For MS DOS/Windows based operating systems the command is slightly different:
>>> errorcode = os.system("CLS")
>>> print( errorcode )
0
But the result in both cases should be that the terminal window is cleared and the errorcode should be zero - which indicates successful completion. This might not seem too useful but we can use system to good effect in our scripts where we only need to display the native output of the command or where we are only interested in the success or failure of the command. For example, we can require the user to edit a configuration file by starting an editor session. When the user is finished they exit the edit session and control returns to our program which can now read the modified file.
>>> filename = 'xxyyzz.config'
>>> errorcode = os.system('nano %s' % filename)
>>> if not errorcode:
...    with open(filename) as config:
...       # process config file here
The example shows a couple of useful techniques. First, it shows a way of parameterizing system calls using string formatting. It also shows us interpreting the errorcode to determine the result of the operation.
If the edit succeeded (even if no changes were made!) the error code will be zero but if it failed (we couldn't find the editor say) then we will get a non-zero error value.
While system is very easy to use it is not particularly flexible and has no direct way of communicating any data back to our programs. We can fake this by capturing the output to a temporary text file and then opening that file and processing it as usual. But there is a much better way of achieving the same result using another module subprocess.
After various, more or less successful, attempts to improve process control a major breakthrough was achieved when the subprocess module arrived in Python version 2.4. This module was explicitly intended to replace all of the earlier mechanisms. Many examples of how to use it are given in the module documentation but we will cover the most general usage here. (There are simpler convenience functions provided if you just want to emulate the os.system functionality or similar). The module is based upon a class called Popen - notice the capital first letter!
The Popen class can be used to create an instance of a command. Unfortunately the documentation is rather daunting since the Popen constructor has a great many parameters. The good news is that they nearly all have default values and can be ignored in the simplest cases. Thus to simply run an OS command from within a script we only need to do this:
import subprocess
ps = subprocess.Popen(['ps', '-ef'], shell=False)
The first argument is a list of strings. The strings represent the command and all of its arguments, this in our example we are executing the Unix command ps -ef
Notice the second argument shell=False. This is to prevent the command being passed through the users shell program (Bash, say) which can introduce security issues due to custom command aliases etc. You should always strive to use shell=False if possible. However, it is sometimes necessary to get the command interpreted by the shell, for example it is needed if you are passing in wild-cards such as "*.jpg" to an image processing application. The shell is what expands the wild-card into a list of actual file names.
I have stored the resultant Popen instance in a variable named after the command I'm executing. This is not necessary but I find it a useful convention, especially if you are running several helper processes at the same time.
There is also a function called call that can be used as a replacement for os.system as in the above example:
subprocess.call(['ps', '-ef'], shell=False)
At this level call is almost identical to the Popen usage described above, but call does not have all of the options available to Popen and does not create any instances so uses slightly less system resources. The downside is that it suffers from all the same disadvantages of os.system.
One big improvement using subprocess rather than the older functions is that the subprocess module raises an OSError exception if the requested command can not be found. The older functions generally left you with no clear indication of an error!
So far our exploration of the subprocess module has not taken us very far beyond what we could do with os.system. That is about to change as we discover how to exchange data with a running process that we started using subprocess.Popen
Let's go back to the ps command that we executed earlier. We were able to start the program running but we still couldn't access its output. To do so we need to make one small change:
import subprocess as sub
ps = sub.Popen(['ps', '-ef'], shell=False, stdout=sub.PIPE)
print( ps.stdout.read().decode('utf8') )
Here we add one extra argument telling Popen to send its standard output, stdout, to a subprocess PIPE. (We will talk much more about pipes in the next topic.) You should recall stdout and its twin stdin from the Talking to the User topic We can then access the output data using the stdout attribute of the Popen instance, which we read like any normal file. The resulting bytestring is then converted to Unicode characters with decode and printed. We could instead have assigned it to a variable and processed it in whatever way we require.
There is however one small fly in the ointment. It turns out that there are some issues with accessing stdout like this. They mainly involve subtle issues around managing multiple concurrent processes and so instead we are encouraged to use the Popen.communicate method which returns a list of data streams with stdout being the first, stdin the second and stderr the third.
If we think that this might be an issue for us then we can then rewrite the example above as:
import subprocess as sub
ps = sub.Popen(['ps', '-ef'], shell=False, stdout=sub.PIPE)
print( ps.communicate()[0].decode('utf8') )
We use Popen.communicate()[0] to access the stdout pipe and all should now be safe and secure.
Sending data to a process follows a similar pattern: We tell Popen to use a PIPE for stdin and then write data to that stream just like a regular file (although the data must be a bytestring not a character string). In the next example we start the Unix line editor ex and send it some data to create a text file. We then close the editor before checking that the new file exists. It looks like this:
import subprocess as sub
import os
ex = sub.Popen(['ex', '/tmp/testex.txt'],stdin=sub.PIPE)
ex.stdin.write(b'i\nthis is some text\n.\n')
ex.stdin.write(b'wq\n')
ex.stdin.close()
print( os.listdir('/tmp') )
Notice that the inputs are all byte strings and that we need to include any carriage returns as newline markers in the strings. Also notice the period in the first ex.stdin.write line. That is what tells ex that the input sequence is finished! The os.listdir call verifies that the new file exists in the tmp folder. (Or you could go and check with your favourite file manager program.)
Writing to a running process is far less common that reading from one, but it's good to know that it is at least feasible!
There's a lot said about computer security these days and most of the facilities that ensure a secure environment are provided by the operating system. Just as other OS features are available through the OS API so we can access security features too, but with the important proviso that the operating system will still regulate our access to certain features according to the rights granted to the user who is running the program. So if we want to gain access to another users files we need to have that permission anyway, it's not an open invite to evade the built-in security of the system - at least it shouldn't be!
In this section we will take a look at some of the security related functions available, such as determining the user id, changing ownership of a file and finally using environment variables to find out about the current user's environment.
The first of these tasks, finding out the current user's ID, is done with the os.getuid function. The User ID is in the form of a number and converting that to a user name is slightly more complex but we rarely need to do that since we can usually get the user's name with the use of the getpass.getuser() function which simply looks at the various environment variables which might hold the information. We use it like this:
>>> import getpass
>>> print( getpass.getuser() )
The user ID is however the value that the program needs to modify security settings, so we obtain it like:
>>> import os
>>> print( os.getuid() )
Probably the most common use for this is to programmatically change the ownership of a file, perhaps one we created earlier as part of our program. For an example we will use one of the files we created earlier in this topic:
import os

os.chdir('src/Python/Root')
os.system('ls -l *.txt')
id = os.getuid()
os.chown('FA.txt',id,-1)
os.system('ls -l *.txt')
We use os.chdir to set the working directory to the place where the files live. We then use system() to display the directory listing (including the file permissions) before and after the call to chown() so that we can see any changes. We call chown() with the user ID that we obtain from getuid() and use -1 for the third parameter of chown() to indicate that we don't want to change the group ownership. (If we did there is also an os.getgid() function for fetching the group id). Note that the script will only have an effect if you run it as a different user from the current owner. Also that user must have permission to affect the change, so I recommend you log in as an administrator (or 'root').
Note that chown() does not tell you anything about the outcome so, if you needed to check the result, you would have to use something like os.stat to check the user id value before and after and thus check that the changes you expect have actually occurred.
In this section we look at the environment in which a process runs. When we start a program it inherits a whole memory context from the program which launches it, which is usually a users command line shell - either Windows CMD or perhaps the Bash or Korn shells on Unix based systems. That environment includes lots of information about the system such as the user's name, home directory, current directory, temporary directory, search paths etc. This means that by setting various environment variables each user can, to some degree, customize how the operating system works and even individual programs. For example Python takes heed of the PYTHONPATH environment variable when searching for modules. So two different users on the same computer could have different module search paths because they have each set up their own value for PYTHONPATH
Programmers can take advantage of this by defining some program specific environment variables that the user can set to override the normal program default values. For this to be effective we need to be able to read the current environment to find these values. To do this we can either read a single variable using the os.getenv() function or all of the currently set variables by looking at the os.environ variable which contains a dictionary of the name/value pairs.
Firstly we will print all of the environment variables, and you might be surprised to see how much information is available in this list:
>>> import os
>>> print( os.environ )
That's it! It couldn't be much easier. Of course we could pretty it up a bit if we wanted to using the normal dictionary and string operations. However, in most cases it's much more useful to get at the value of the variables one at a time, which we do like this:
>>> os.getenv('PYTHONPATH')
or
>>> os.environ['PYTHONPATH']
This shows whether we have set our PYTHONPATH variable and if so, to what. Because of the risk that the variable is not set getenv() allows us to set a default result if the variable is not defined. (We can use the standard dictionary get() method to do the same for the environ dictionary.)
Typical usage of this would be during initialization of a program when we set up things like the folder in which data files are found. In the following example we check to see where our address books should be stored, using a default of the current directory if no variable exists:
# ... other initialization steps here.
folder = os.getenv('PY_ADDRESSES', os.getcwd())
# ... rest of program here
If no value exists for the variable PY_ADDRESSES then getenv() returns its second argument, which is our default location.
Normally the user would create and set such environment variables manually using the operating system. For example in Windows it's done via the
MyComputer->Properties->Advanced->Environment Variables
sequence of settings.
On Linux or MacOS it is done from a command prompt by using the export or setenv commands depending on the shell being used.
On some operating systems, but not all, it is possible to change the values of an existing environment variable. Be very careful if you do this since on some systems it can result in you overwriting other values. Also while some operating systems will mirror these changes back into the users environment in most cases the changes will only apply in the context of the writing process.
Thus if the OS supports it we could write our default folder value back to the users environment to ensure that other instances of our program use the same location. (Due to the fragility of this mechanism I do not recommend that you use it, a config file is a much more reliable mechanism for this kind of setting.)
# other code as above
putenv('PY_ADDRESSES', folder)
# ... carry on with the rest of the program
Some Unix environment variables are used by many programs, for example:
That's all I'll say about environments for now. We will touch on them again in a later topic but for now, if you are wondering how to get user-specific data remember to look and see if it's already there as an environment variable, or alternatively give the user the option of setting it via an environment variable specific to your program.
The os module and its friends contain far too much to cover in a single topic. In fact even the Python documentation takes several HTML pages to describe the os module alone and a page each for the other modules. Please explore the wealth of functionality provided. You will discover many weird and wonderful names in there. Many of these come from the Unix operating system and its API. The os module does its best to provide equivalent functionality on any operating system but if you want to find out more about what these functions do, often the best way is to read the Unix documentation. A good place to start, especially if you don't have a Unix/Linux system to hand, is with the O'Reilly book, Unix Systems Programming for SVR4.
And if this look at operating systems has whetted your appetite then a good general operating systems book is Fundamentals of Operating Systems by A.M. Lister. It's short and easy to read with many diagrams of the concepts. If you want to get closer to the code level then there is no better book than Andrew Tanenbaum's classic text: Operating Systems: Design And Implementation. This was the book that inspired Linus Torvalds to write his own operating system, which went on to become the phenomenon that is Linux!
Points to remember