Object Oriented Programming
What will we cover?
- What is an object?
- What is a class?
- What are polymorphism and inheritance?
- Creating, Storing and using objects
What is Object Oriented Programming?
Although the ideas behind Object Oriented Programming
were developed in the late 1960's it was not until the 1980's that
it became widely known in the programming community with the
release of Smalltalk-80 and a variety of Lisp implementations.
During the 1980's it remained a curiosity rather than a
mainstream concept. It was the popularisation of the graphical
user interface or GUI, first on the Apple Mac and later in
MS Windows (and X windows in the Unix world) with its windows,
buttons and menus that really turned things around. By the end
of the millennium, Object Oriented Programming, or OOP,
had become the pre-eminent technique for software development.
Languages like Java, C++ and Python embody the concept so
much that you can do very little without coming across objects
somewhere. So what's it all about? It is quite a big topic and
many books have been written about it. We can only touch on
the concepts here but if you would like to dig deeper into
the depths
then the best introductions are, in my opinion:
- Object Oriented Analysis by Peter Coad & Ed
Yourdon.
- Object Oriented Analysis and Design with
Applications by Grady Booch (the 1st or 3rd editions
for preference)
- Object Oriented Software Construction by Bertrand
Meyer (definitely the 2nd edition of this one)
These increase in depth, size and academic exactitude as you
go down the list. For most non-professional programmers' purposes
the first is adequate. None of these are really programming books
but also discuss analysis and design. This is because OOP is best
practiced by applying the principles throughout the project
lifecycle, it is genuinely a different way of thinking about
problems.
Assuming you don't have the time nor the inclination to
research all these books and links right now, I'll give you a
brief overview of the concept. (Note:Some people find OO
hard to grasp others 'get it' right away. Don't worry if you come
under the former category, you can still use objects even without
really 'seeing the light'. The more you use them the clearer
it gets.)
One final point: it is possible to implement an Object
Oriented design in a non OO language through coding conventions,
but it's usually an option of last resort rather than a
recommended strategy. If your problem fits well with OO
techniques then it's best to use an OO language. Most modern
languages, including Python, VBScript and JavaScript support OOP
quite well. That having been said I will be using Python
throughout all the examples and only showing the basic concepts
in VBScript and JavaScript with little additional
explanation.
Data and Function - together
Objects are collections of data and functions that operate on
that data. These are bound together so that you can pass an
object from one part of your program and they automatically get
access to not only the data attributes but the
operations that are available too. This combining of data
and function is the very essence of Object Oriented Programming
and is known as encapsulation. (Some programming languages
make the data invisible to users of the object and thus require
that the data be accessed via the object's methods. This
technique is properly known as data hiding, however in
some texts data hiding and encapsulation are used interchangeably.)
As an example of encapsulation, a string object would store
the character string but also provide methods to operate
on that string - search, change case, calculate length etc.
Objects use a message passing metaphor whereby one
object passes a message to another object and the receiving
object responds by executing one of its operations, a
method. So a method is invoked on receipt of the
corresponding message by the owning object. There are various
notations used to represent this but the most common mimics the
access to items in modules - a dot. Thus, for a fictitious
widget class:
w = Widget()
w.paint()
This would cause the paint method of the widget object to be
invoked.
Defining Classes
Just as data has various types so objects can have different
types. These collections of objects with identical
characteristics are collectively known as a class. We can
define classes and create instances of them, which are the
actual objects. We can store references to these objects in
variables in our programs.
Let's look at a concrete example to see if we can explain it
better. We will create a message class that contains a string -
the message text - and a method to print the message.
class Message:
    def __init__(self, aString):
        self.text = aString
    def printIt(self):
        print( self.text )
Note 1:One of the methods of this class is called
__init__ and it is a special method called a
constructor. The reason for the name is that it is called
when a new object instance is created or constructed. Any
variables assigned (and hence created in Python) inside this
method will be unique to the new instance. There are a number of
special methods like this in Python, nearly all distinguished by
the __xxx__ naming format (and informally known as
"dunder" methods by the Python community). The exact timing of
when a constructor is called varies between languages, in Python
init gets called after the instance has actually been
created in memory, in other languages the constructor actually
returns the instance itself. The difference is sufficiently
subtle that you don't usually need to worry about it.
Note 2:Both the methods defined have a first parameter
self. The name is a convention but it indicates the
object instance. As we will soon see this parameter is filled in
by the interpreter at run-time, not by the programmer. Thus
printIt is called, on an instance of the class (see
below), with no arguments: m.printIt().
Note 3:We called the class Message with a
capital 'M'. This is purely convention, but it is fairly widely
used, not just in Python but in other OO languages too. A related
convention says that method names should begin with a lowercase
letter and subsequent words in the name begin with uppercase
letters. Thus a method called "calculate current balance" would
be written: calculateCurrentBalance.
You may want to briefly revisit the
'Raw Materials' section and look again at 'user defined types'.
The Python address example should be a little clearer now.
Essentially the only kind of user-defined type in Python is
a class. A class with attributes but no methods (except
__init__ ) is effectively equivalent to a construct
called a record or struct in some programming
languages.
A Graphical Notation
The software engineering community have adopted a
graphical notation for describing classes and objects and
their relationships to each other. This notation is called
the Unified Modelling Language (or UML) and is a
powerful design tool. In total UML contains many diagrams
and icons but we will only look at a few here that may help
you grasp the concepts.
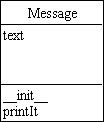
The first and most important icon we meet in UML is the
class description, it consists of a box with three
compartments. The top compartment contains the class name,
the middle compartment contains the class attributes, or
data, and the bottom compartment contains the methods, or
functions, of the class.
The Message class defined above would look like this:
We will show other UML icons as we develop the topic and
introduce new concepts supported by the notation.
Using Classes
Having defined a class we can now create instances of our
Message class and manipulate them:
m1 = Message("Hello world")
m2 = Message("So long, it was short but sweet")
notes = [m1, m2]
for msg in notes:
msg.printIt()
So in essence you just treat the class as if it was a standard
Python data type, which was after all the purpose of the
exercise!
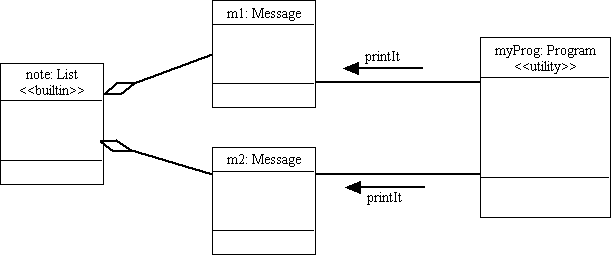
UML also has an icon for an object or instance. It is the
same as the class icon, except we usually leave the bottom
two boxes blank. The name is made up of the object or
instance name followed by the class name with a colon in
between. Thus m1:Message tells us that m1
is an instance of the Message class.
Our message example would be drawn like this:
Note that the List class represents the normal
Python list type (as indicated by the word builtin
being within angle brackets, a construct known as a
stereotype in UML). The lines with diamonds indicate
that the list contains the Message objects.
The MyProg object likewise is stereotyped as being
a utility class, which means, in this case, that it
does not exist as a class within the program but is a
product of the environment. ( Operating system facilities
are often shown this way, as are libraries of functions.)
The solid lines from myProg to Message
indicate that the myProg "object" has an
association with, or reference to, the
Message objects. The arrows adjacent to these
lines indicate that the myProg "object" sends the
printIt message to each of the Message
objects. In effect object messages are transmitted via
associations.
What is "self"?
No, it's not a philosophical debate, it's one of the questions
most often asked by new Python OOP programmers. Every method
definition in a class in Python starts with a parameter called
self. The actual name self is just a convention,
but like many programming conventions consistency is good so
let's stick with it! (As you'll see later JavaScript has a
similar concept but uses the name this instead.)
So what is self all about? Why do we need it?
Basically self is just a reference to the current instance.
When you create an instance of the class the instance contains
its own data (as created by the constructor) but not of the
methods. Thus when we send a message to an instance and it calls
the corresponding method, it does so via an internal reference to
the class. It passes a reference to itself (self!) to the method
so that the class code knows which instance to use.
Let's look at a relatively familiar example. Consider a GUI
application which has lots of Button objects. When a user presses
a button the method associated with a button press is activated -
but how does the Button method know which of the buttons has been
pressed? The answer is by referring to the self value which will
be a reference to the actual button instance that was pressed.
We'll see this in practice when we get to the GUI topic a little
later.
So what happens when a message is sent to an object? It works
like this:
- the client code calls the instance (sending the message in
OOP speak).
- The instance calls the class method, passing a reference to
itself (self).
- The class method then uses the passed reference to pick up
the instance data for the receiving object.
You can see this in action in this code sequence, notice that
we can explicitly call the class method, as we do in the last
line:
>>> class C:
... def __init__(self, val): self.val = val
... def f(self): print ("hello, my value is:", self.val)
...
>>>
>>> a = C(27)
>>> b = C(42)
>>>
>>> a.f()
hello, my value is 27
>>> b.f()
hello, my value is 42
>>>
>>> C.f(a)
hello, my value is 27
So you see we can call the methods via the instance, in which
case Python fills in the self parameter for us, or explicitly via
the class, in which case we need to pass the self value
explicitly.
Now you might be wondering why, if Python can provide the
invisible reference between the instance and its class can't
Python also magically fill in the self by itself? The answer is
that Guido van Rossum designed it this way! Many OOP languages do
indeed hide the self parameter, but one of the
guiding principles of Python is that "explicit is better than
implicit". You soon get used to it and after a while not doing
it seems strange.
Same thing, Different thing
What we have so far is the ability to define our own types
(classes) and create instances of these and assign them to
variables. We can then pass messages to these objects which
trigger the methods we have defined. But there's one last element
to this OO stuff, and in many ways it's the most important aspect
of all.
If we have two objects of different classes but which support
the same set of messages but with their own corresponding methods
then we can collect these objects together and treat them
identically in our program but the objects will behave
differently. This ability to behave differently to the same input
messages is known as polymorphism.
Typically this could be used to get a number of different
graphics objects to draw themselves on receipt of a 'paint'
message. A circle draws a very different shape from a triangle
but provided they both have a paint method we, as programmers,
can ignore the difference and just think of them as 'shapes'.
Let's look at an example, where instead of drawing shapes we
calculate their areas:
First we create Square and Circle classes:
class Square:
    def __init__(self, side):
        self.side = side
    def calculateArea(self):
        return self.side**2

class Circle:
    def __init__(self, radius):
        self.radius = radius
    def calculateArea(self):
        import math
        return math.pi*(self.radius**2)
Now we can create a list of shapes (either circles or squares)
and then print out their areas:
shapes = [Circle(5),Circle(7),Square(9),Circle(3),Square(12)]

for item in shapes:
    print "The area is: ", item.calculateArea()
Now if we combine these ideas with modules we get a very
powerful mechanism for reusing code. Put the class definitions in
a module - say 'shapes.py' and then simply import that module
when we want to manipulate shapes. This is exactly what has been
done with many of the standard Python modules, which is why
accessing methods of an object looks a lot like using functions
in a module.
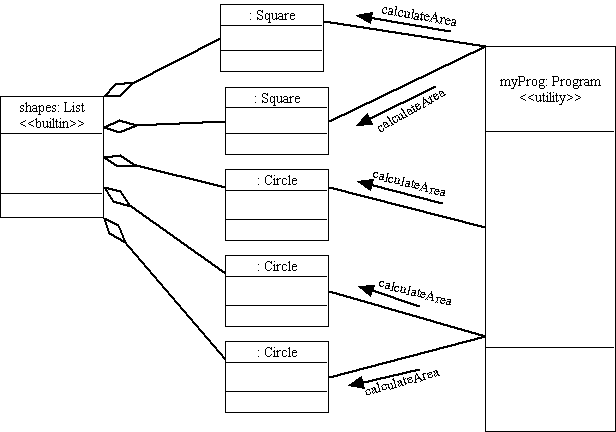
Here we see a more complex object diagram. Notice that
in this case the objects within the list do not have names
because we did not explicitly create variables for them. In
this case we just show a blank before the colon and class
name. However, the diagram is starting to get very busy.
For this reason we only draw object diagrams when necessary
to illustrate some unusual feature of the design. Instead
we use more sophisticated features of class diagrams to
show the relationships, as we'll see in the examples
below.
Inheritance
Inheritance is often used as a mechanism to implement
polymorphism. Indeed in many OO languages it is the only way to
implement polymorphism. It works as follows:
A class can inherit both attributes and operations from
a parent or super class. This means that a new
class which is identical to another class in most respects does
not need to re-implement all the methods of the existing class,
rather it can inherit those capabilities and then override
those that it wants to do differently (like the
calculateArea method in the case above)
Again an example might illustrate this best. We will use a
class hierarchy of bank accounts where we can deposit
cash, obtain the balance and make a withdrawal. Some of the
accounts provide interest (which, for our purposes, we'll assume
is calculated on every deposit - an interesting innovation to the
banking world!) and others charge fees for withdrawals.
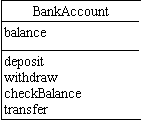
The BankAccount class
Let's see how that might look. First let's consider the
attributes and operations of a bank account at the most general
(or abstract) level.
It's usually best to consider the operations first then
provide attributes as needed to support these operations. So for
a bank account we can:
- Deposit cash,
- Withdraw cash,
- Check current balance and
- Transfer funds to another account.
To support these operations we will need a bank account ID
(for the transfer operation) and the current balance. In this
example, for the ID, we will just use the variable to which we
assign the object but, in a real project we would likely create
an ID attribute which stored a unique reference. We will also
need to store the balance.
In UML that would look like:
We can now create a class to support that:
class BalanceError(Exception):
value = "Sorry you only have $%6.2f in your account"
class BankAccount:
def __init__(self, initialAmount):
self.balance = initialAmount
print( "Account created with balance %5.2f" % self.balance )
def deposit(self, amount):
self.balance = self.balance + amount
def withdraw(self, amount):
if self.balance >= amount:
self.balance = self.balance - amount
else:
raise BalanceError()
def checkBalance(self):
return self.balance
def transfer(self, amount, account):
try:
self.withdraw(amount)
account.deposit(amount)
except BalanceError:
print( BalanceError.value % self.balance )
Note 1: We check the balance before withdrawing and
also use an exception to handle errors. Of course there is no
Python error type BalanceError so we needed to create
one of our own - it's simply an subclass of the standard
Exception class with a string value. The string
value is defined as an attribute of the exception class
purely as a convenience, it ensures that we can generate standard
error messages every time we raise an error. Notice that we
didn't use self when defining the value in
BalanceError, that's because value is
a shared attribute across all instances, it is defined at
the class level and known as a class variable.
We access it by using the class name followed by a dot:
BalanceError.value as seen above. Now, when the error
generates its traceback it concludes by printing out the
formatted error string showing the current balance.
Note 2: The transfer method uses the
BankAccount's withdraw/deposit member
functions or methods to do the transfer. This is very common
in OO and is known as self messaging. It means that
derived classes can implement their own versions of
deposit/withdraw but the transfer method can
remain the same for all account types.
OK, now that we have defined our BankAccount as a
base class we can get back to inheritance which is what we
are supposed to be discussing! Let's look at our first sub
class.
The InterestAccount class
Now we use inheritance to provide an account that adds
interest (we'll assume a default of 3%) on every deposit. It will
be identical to the standard BankAccount class except for the
deposit method and the initialisation of the interest rate. So we
simply override those:
class InterestAccount(BankAccount):
   def __init__(self, initialAmount, interest=0.03):
       super().__init__(initialAmount)
       self.interest = interest
   def deposit(self, amount):
       super().deposit(amount)
       self.balance = self.balance * (1 + self.interest)
Note 1: We pass the super-class
(or parent) as a parameter in the class definition.
In this case the parent is BankAccount
Note 2: We call the super().__init__) at the
beginning of the __init__() method. super() is
a special function which works out what the superclass is. This
is helpful in cases where we inherit more than one superclass
(yes, you can do that too! It's called multiple inheritance
and you'll see an example later in this topic) and avoids some
obscure issues which can arise if you try calling the superclass
by name. So always use super(). By calling the
__init__ method of the superclass we get all the
initialisation of our inherited class(es) for free. We just need
to initialise the new interest attribute that we introduced
here. The same applies to the use of super() in the
deposit method, it simply calls the parent class' deposit
method so that we only need to add the new features of our
InterestAccount).
And that's it. We begin to see the power of OOP, all the other
methods have been inherited from BankAccount (by putting
BankAccount inside the parentheses after the new class
name). Notice that once again deposit called the
super-class's deposit method rather than copying
the code. Now if we modify the BankAccount deposit to
include some kind of error checking the sub-class will
gain those changes automatically.
The ChargingAccount class
This account is again identical to a standard
BankAccount class except that this time it charges a
default fee of $3 for every withdrawal. Just as we did for the
InterestAccount we can create a class inheriting from
BankAccount and, this time, modify the init
and withdraw methods:
class ChargingAccount(BankAccount):
    def __init__(self, initialAmount, fee=3):
        super().__init__(initialAmount)
        self.fee = fee

    def withdraw(self, amount):
        super().withdraw(amount+self.fee)
Note 1: We store the fee as an instance variable
so that we can change it later if necessary. Notice that we again
call the inherited __init__ just like any other
method.
Note 2: We simply add the fee to the requested
withdrawal in the call to the inherited withdraw
method which does all the real work.
Note 3: We introduce a side effect here in that a
charge is automatically levied on transfers too, but that's
probably what we want, so is OK. But its worth noting that
all this reuse does carry a potential penalty of unexpected
side-effects which you need to look out for.
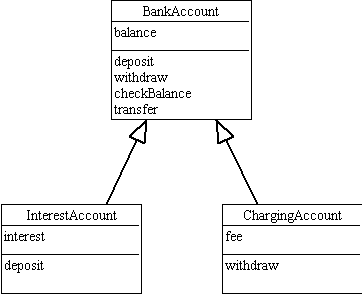
In UML we represent inheritance with a solid arrow pointing
from the sub class to the superclass. We can now represent
our bank account heirarchy like this:
Notice we only list the methods and attributes that have
changed or been added in sub classes.
Testing our system
To check that it all works try executing the following piece
of code (either at the Python prompt or by creating a separate
test file).
from bankaccount import *
a = BankAccount(500)
b = BankAccount(200)
a.withdraw(100)
# a.withdraw(1000)
a.transfer(100,b)
print( "A = ", a.checkBalance() )
print( "B = ", b.checkBalance() )
c = InterestAccount(1000)
c.deposit(100)
print( "C = ", c.checkBalance() )
d = ChargingAccount(300)
d.deposit(200)
print( "D = ", d.checkBalance() )
d.withdraw(50)
print( "D = ", d.checkBalance() )
d.transfer(100,a)
print( "A = ", a.checkBalance() )
print( "D = ", d.checkBalance() )
print( "C = ", c.checkBalance() )
print( "D = ", d.checkBalance() )
d.transfer(20,c)
print( "C = ", c.checkBalance() )
print( "D = ", d.checkBalance() )
Now uncomment the line a.withdraw(1000) to see the
exception at work.
That's it. A reasonably straightforward example but it shows
how inheritance can be used to quickly extend a basic framework
with powerful new features.
We've seen how we can build up the example in stages and how
we can put together a test program to check it works. Our tests
were not complete in that we didn't cover every case and there
are more checks we could have included - like what to do if an
account is created with a negative amount...
Test Driven Development
Many professional programmers use a technique known as
Test Driven Development (TDD) in which they write their
tests before they write their code. This may initially
sound bizarre but it allows them to test their code
repeatedly as they develop it and move from a state where
every test fails to one where every test passes. At that
point their program should work properly!
So popular is this that special tools have been
developed to assist with this approach. Python has several
such tools including the unittest module that is
in the standard library. TDD is a good approach when writing
serious code however in the context of a tutorial it would
simply hide the main code that we are trying to study
amongst a mass of test cases so I won't be using it here.
But its a concept we look at in more detail in a later topic.
Collections of Objects
One problem that might have occurred to you is how we deal
with lots of objects. Or how to manage objects which we create at
runtime. It's all very well creating bank accounts statically as
we did above:
acc1 = BankAccount(...)
acc2 = BankAccount(...)
acc3 = BankAccount(...)
etc...
But in the real world we don't know in advance how many
accounts we need to create. How do we deal with this? Let's
consider the problem in more detail:
We need some kind of 'database' that allows us to find a given
bank account by its owners name (or more likely their bank
account number - since one person can have many accounts and
several persons can have the same name...)
Finding something in a collection given a unique key....hmmm,
sounds like a dictionary! Let's see how we'd use a Python
dictionary to hold dynamically created objects:
from bankaccount import BankAccount
import time
def getNextID():
ok = input("Create account[y/n]? ")
if ok[0] in 'yY':
id = time.time()
id = int(id) % 10000
else: id = -1
return id
accountData = {}
while True:
id = getNextID()
if id == -1:
break
bal = float(input("Opening Balance? "))
accountData[id] = BankAccount(bal)
print( "New account created, Number: %04d, Balance %0.2f" % (id, bal) )
for id in accountData.keys():
print( "%04d\t%0.2f" % (id, accountData[id].checkBalance()) )
while True:
id = int(input("Which account number? "))
if id in accountData:
print( "Balance = %0.2d" % accountData[id].checkBalance() )
else: print( "Invalid ID" )
Of course the key you use for the dictionary can be anything
that uniquely identifies the object, it could be one of its
attributes, like balance say (except that balance would
not be a very good unique key!). Anything at all that is unique.
You might find it worthwhile going back to the
raw materials chapter and reading the dictionary section again,
they really are very useful containers.
We can represent that graphically in UML using a class
diagram. The dictionary is shown as a class which has a
relationship with many BankAccounts. This is shown
by the asterisk on the line connecting the classes. An
asterisk is used because that is the symbol used in regular
expressions to indicate zero or more items. This is known
as the cardinality of the relationship and can be
shown in a number of ways but the regular expression
numeric ranges are quite commonly used because of their
richness and flexibility.
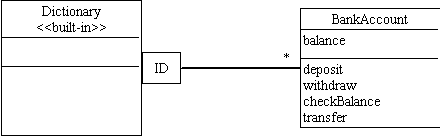
Notice the use of a stereotype on the Dictonary
to show it is a built-in class. Notice also the box
attached to the association showing that the key is the
ID value. If we had been using a simple list we
would not have had the box and the line would have directly
connected the two classes. This use of class relationships
and cardinality is how we avoid the need for very large
complex Object diagrams. We can focus on the abstract
relationships between classes rather than the myriad of
physical relationships between individual instances.
Saving Your Objects
One snag with all of this is that you lose your data when the
program ends. You need some way of saving objects too. As you get
more advanced you will learn how to use databases to do that but
we will look at using a simple text file to save and retrieve
objects. If you are using Python there are a couple of modules
(called pickle and shelve) that do this much
more effectively but as usual I'll try to show you the generic
way to do it that will work in any language. Incidentally the
technical term for the ability to save and restore objects is
Persistence.
The generic way to do this is to create save and
restore methods at the highest level object and override
in each class, such that they call the inherited version and then
add their locally defined attributes:
class A:
def __init__(self,x,y):
self.x = x
self.y = y
self.f = None
def save(self,fn):
f = open(fn,"w")
f.write(str(self.x)+ '\n')
f.write(str(self.y)+'\n')
return f
def restore(self, fn):
f = open(fn)
self.x = int(f.readline())
self.y = int(f.readline())
return f
class B(A):
def __init__(self,x,y,z):
super().__init__(x,y)
self.z = z
def save(self,fn):
f = super().save(fn)
f.write(str(self.z)+'\n')
return f
def restore(self, fn):
f = super().restore(fn)
self.z = int(f.readline())
return f
a = A(1,2)
b = B(3,4,5)
a.save('a.txt').close()
b.save('b.txt').close()
newA = A(5,6)
newA.restore('a.txt').close()
newB = B(7,8,9)
newB.restore('b.txt').close()
print( "A: ",newA.x,newA.y )
print( "B: ",newB.x,newB.y,newB.z )
Note: The values printed out are the restored values
not the ones we used to create the instances.
The key thing is to override the save/restore methods in each
class and to call the parent method as the first step. Then in
the child class only deal with child class attributes. Obviously
how you turn an attribute into a string and save it is up to you
the programmer but it must be output on a single line. When
restoring you simply reverse the storing process.
One big snag with this approach is that you need to create a
separate file for each object. In a real world example that could
mean thousands of very small files. This quickly gets cumbersome
and so using a database to store the objects becomes necessary.
We will look at how to do that in a later topic, but the basic
principles remain the same.
Mixing Classes and Modules
Modules and classes both provide mechanisms for controlling
the complexity of a program. It seems reasonable that as programs
get bigger we would want to combine these features by putting
classes into modules. Some authorities recommend putting each
class into a separate module but I find this simply creates an
explosion of modules and increases rather than decreases
complexity. Instead I group classes together and put the group
into a module. Thus in our example above I might put all the bank
account class definitions in one module, bankaccount,
say, and then create a separate module for the application code
that uses the module.
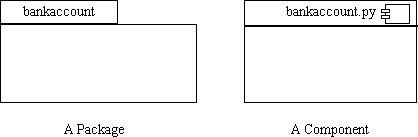
We can represent that graphically in UML in two ways.
The logical grouping of the classes can be represented
using a Package or we can represent the physical
file as a component. The icons for these are shown
below:
The intention is that the Package icon should look
somewhat like a folder in a typical file explorer tool. The
little icon at top right in the component icon is actually
the old UML symbol for a component but this was a bit
cumbersome in diagrams when trying to draw lines showing
relationships between components so they demoted it to a
small embellishment in UML 2.0
That's all the UML I'll be covering, if you find it
interesting and a useful way to visualise your design then
a Google search will throw up lots of references and
tutorials and you will find some UML drawing tools too,
although the shapes are sufficiently easy to draw that you
can use just about any vector graphics package.
A simplified representation of that design would be:
class BankAccount: ....
class InterestAccount: ...
class ChargingAccount: ...
And then to use it:
import bankaccount
newAccount = bankaccount.BankAccount(50)
newChrgAcct = bankaccount.ChargingAccount(200)
But what happens when we have two classes in different modules
that need to access each others details? The simplest way is to
import both modules, create local instances of the classes we
need and pass the instances of one class to the other instance's
methods. Passing whole objects around is what makes it object
oriented programming. You don't need to extract the
attributes out of one object and pass them into another, just
pass the entire object. Now if the receiving object uses a
polymorphic message to get at the information it needs then the
method will work with any kind of object that supports the
message.
Let's make that more concrete by looking at an example. Let's
create a short module called logger that contains two
classes. The first class, called Logger, logs activity
in a file. This logger will have a single method log()
which takes a "loggable object" as a parameter. The other class
in our module is a Loggable class that can be inherited
by other classes to work with the logger. It looks like this:
class Loggable:
def activity(self):
return "This needs to be overridden locally"
class Logger:
def __init__(self, logfilename = "logger.dat"):
self._log = open(logfilename,"a")
def log(self, loggedObj):
self._log.write(loggedObj.activity() + '\n')
def __del__(self):
self._log.close()
Note that we have provided a destructor method
(__del__) to close the file when the logger object is
deleted or garbage collected. This is another "magic method" in
Python (as shown by the double '_' characters) similar in many
ways to __init__(). The difference is that whereas
init is called when an instance is created, the
del method is called just before the garbage collector
deletes the instance. (There is a slight problem in that the
del method may never be called if Python exits
unexpectedly. But if that happens you are likely to have other
issues to deal with too!)
Also notice that we've called the log attribute _log
with a '_' character in front of the name. This is another common
naming convention in Python, like using capitalized words for
class names. A single underscore indicates that the attribute is
not intended to be accessed directly, but only via the methods of
the class.
Now before we can use our module we will create a new module
which defines loggable versions of our bank account classes:
import bankaccount, logger
class LoggableBankAccount(bankaccount.BankAccount, logger.Loggable):
def activity(self):
return "Account balance = %d" % self.checkBalance()
class LoggableInterestAccount(bankaccount.InterestAccount,
logger.Loggable):
def activity(self):
return "Account balance = %d" % self.checkBalance()
class LoggableChargingAccount(bankaccount.ChargingAccount,
logger.Loggable):
def activity(self):
return "Account balance = %d" % self.checkBalance()
Notice we are using multiple inheritance, where we
inherit not one but two parent classes. This isn't strictly
needed in Python since we could just have added an
activity() method to our original classes and
achieved the same effect but in statically typed OOP languages
such as Java or C++ this technique would be necessary so I will
show you the technique here for future reference.
The sharp eyed amongst you may have noticed that the
activity() method in all three classes is identical.
That means we could save ourselves some typing by creating an
intermediate type of loggable account class that inherits
Loggable and only has an activity method. We can then create our
three different loggable account types by inheriting from that
new class as well as from the vanilla Loggable class. Like
this:
class LoggableAccount(logger.Loggable):
     def activity(self):
         return "Account balance = %d" % self.checkBalance()

class LoggableBankAccount(bankaccount.BankAccount, LoggableAccount):
     pass

class LoggableInterestAccount(bankaccount.InterestAccount, LoggableAccount):
     pass

class LoggableChargingAccount(bankaccount.ChargingAccount, LoggableAccount):
     pass
It doesn't save a lot of code but it does mean we only have
one method definition to test and maintain instead of three
identical methods. This type of programming, where we introduce a
superclass with shared functionality is sometimes called mixin
programming and the minimal class is called a mixin
class. It is a common outcome of this style that the final
class definitions have little or no body but a long list of
inherited classes, just as we see here. It's also quite common
that mixin classes do not themselves inherit from anything,
although in this case we did. In essence it's just a way of
adding a common method (or set of methods) to a class or set of
classes via the power of inheritance. (The term mixin originates
in the world of ice cream parlours where different flavours of
ice cream are added (or mixed in) to vanilla to produce a new
flavour. The first language to support this style was called
Flavors which was a popular dialect of Lisp for a while.)
Now we come to the point of this exercise which is to show our
application code creating a logger object and some bank accounts
and passing the accounts to the logger, even though they are all
defined in different modules!
import logger
import loggablebankaccount as lba
log = logger.Logger()
ba = lba.LoggableBankAccount(100)
ba.deposit(700)
log.log(ba)
intacc = lba.LoggableInterestAccount(200)
intacc.deposit(500)
log.log(intacc)
Note the use of the as keyword to create a shortcut
name when importing loggablebankaccount
Note also that once we have created the local instances we no
longer need to use the module prefix and because there is no
direct access from one object to the other, it is all via
messages, there is no need for the two class definition modules
to directly refer to each other either. Finally notice also that
the Logger works with instances of both
LoggableBankAccount and LoggableInterestAccount
because they both support the Loggable interface.
Compatibility of object interfaces via polymorphism is the
foundation upon which all OOP programs are built.
I should point out that a much more sophisticated logging
system is included in the standard library logging
module, this one was purely to demonstrate some techniques. If
you do really want logging facilities in your own programmes
investigate the standard logging module first of all.
Hopefully this has given you a taste of Object Oriented
Programming and you can move on to some of the other online
tutorials, or read one of the books mentioned at the beginning
for more information and examples. Now we will briefly look at
how OOP is done in VBScript and JavaScript.
OOP in VBScript
VBScript supports the concept of objects and allows us to
define classes and create instances, however it does not
support the concepts of inheritance or polymorphism. VBScript is
therefore what is known as Object Based rather than fully
Object Oriented. Nonetheless the concepts of combining data and
function in a single object remain useful, and a limited form of
inheritance is possible using a technique called delegation which
we discuss below.
Defining classes
A class is defined in VBScript using the Class
statement, like this:
<script type=text/VBScript>
Class MyClass
   Private anAttribute
   Public Sub aMethodWithNoReturnValue()
       MsgBox "MyClass.aMethodWithNoReturnValue"
   End Sub
   Public Function aMethodWithReturnValue()
       MsgBox "MyClass.aMethodWithReturnValue"
       aMethodWithReturnValue = 42
   End Function
End Class
</script>
This defines a new class called MyClass with an
attribute called anAttribute which is only visible to
the methods inside the class, as indicated by the keyword
Private. It is conventional to declare data attributes
to be Private and most methods to be Public.
This is known as data hiding and has the advantage of allowing us
to control access to the data by forcing methods to be used and
the methods can do data quality checks on the values being passed
in and out of the object. Python provides its own mechanism for
achieving this but it is beyond the scope of this tutorial.
Creating Instances
We create instances in VBScript with a combination of the
Set and New keywords. The variable to which the
new instance is assigned must also have been declared with the
Dim keyword as is the usual VBScript style.
<script type=text/VBScript>
Dim anInstance
Set anInstance = New MyClass
</script>
This creates an instance of the class declared in the previous
section and assigns it to the anInstance variable. Notice
that you must precede the variable name with Set and use
the New keyword to create the object.
Sending Messages
Messages are sent to instances using the same dot notation
used by Python.
<script type=text/VBScript>
Dim aValue
anInstance.aMethodWithNoReturnValue()
aValue = anInstance.aMethodWithReturnValue()
MsgBox "aValue = " & aValue
</script>
The two methods declared in the class definition are called,
in the first case there is no return value, in the second we
assign the return value to the variable aValue. There is
nothing unusual here apart from the fact that the subroutine and
function are preceded by the instance name.
Inheritance and Polymorphism
VBScript as a language does not provide any inheritance
mechanism nor any mechanism for polymorphism. However we can fake
it to some degree by using a technique called delegation.
This simply means that we define an attribute of the sub class to
be an instance of the theoretical parent class. We then define a
method for all of the "inherited" methods which simply calls (or
delegates to), the method of the parent instance. Let's
subclass MyClass as defined above:
<script type=text/VBScript>
Class SubClass
   Private parent
   Private Sub Class_Initialize()
      Set parent = New MyClass
   End Sub
   Public Sub aMethodWithNoReturnValue()
      parent.aMethodWithNoREturnVAlue
   End Sub
   Public Function aMethodWithReturnValue()
      aMethodWithReturnValue = parent.aMethodWithReturnValue
   End Function
   Public Sub aNewMethod
      MsgBox "This is unique to the sub class"
   End Sub
End Class

Dim inst,aValue
Set inst = New SubClass
inst.aMethodWithNoReturnVAlue
aValue = inst.aMethodWithReturnValue
inst.aNewMethod
MsgBox "aValue = " & CStr(aValue)
</script>
The key points to note here are the use of the private
attribute parent and the special, private method
Class_Initialise. The former is the superclass delegate
attribute and the latter is the equivalent of Python's
__init__ method for initializing instances when they are
created, it is the VBScript constructor in other words.
OOP in JavaScript
JavaScript supports objects using a technique called
prototyping. This means that there is no explicit class
construct in JavaScript and instead we can define a class in
terms of a set of functions, or as a dictionary-like concept known
as an initializer.
Defining classes
The most common way to define a JavaScript "class" is to
create a function with the same name as the class, effectively
this is the constructor, but is not contained within any other
construct. It looks like this:
<script type=text/JavaScript>
function MyClass(theAttribute)
{
   this.anAttribute = theAttribute;
};
</script>
You might notice the keyword this which is used in
the same way as Python's self as a placeholder reference
to the current instance. (You will notice however that we don't
need to explicitly include this in the parameter list
of the class' methods.)
We can add new attributes to the class later using the built
in prototype attribute like this:
<script type=text/JavaScript>
MyClass.prototype.newAttribute = null;
</script>
This defines a new attribute of MyClass called
newAttribute.
Methods are added by defining a normal function then assigning
the function name to a new attribute with the name of the method.
Normally the method and function have the same name, but there is
nothing to stop you calling the methods something different, as
illustrated below:
<script type=text/JavaScript>
function oneMethod(){
    return this.anAttribute;
}
MyClass.prototype.getAttribute = oneMethod;
function printIt(){
    document.write(this.anAttribute + "<BR>");
};
MyClass.prototype.printIt = printIt;
</script>
Of course it would be more convenient to define the functions
first then finish up with the constructor and assign the methods
inside the constructor and this is in fact the normal approach,
so that the full class definition looks like this:
<script type=text/JavaScript>
function oneMethod(){
    return this.anAttribute;
};

function printIt(){
    document.write(this.anAttribute + "<BR>");
};

function MyClass(theAttribute)
{
   this.anAttribute = theAttribute;
   this.getAttribute = oneMethod;
   this.printIt = printIt;
};
</script>
There is another way to do this in JavaScript,
which is to use a slightly different syntax for
creating the method functions. JavaScript allows
us to define a function like this:
square = function(x){ return x*x;}
And we can call that as usual like:
document.write("The square of 5 is: " + square(5))
Now applying that to our class definition we get:
<script type=text/JavaScript>
function MyClass(theAttribute)
{
   this.anAttribute = theAttribute;
   this.getAttribute = function(){
                       return this.anAttribute;
                       };
   this.printIt = function printIt(){
                  document.write(this.anAttribute + "<BR>");
                  };
};
</script>
This approach is preferred by some programmers
because it keeps the method definitions inside the class
with no pollution of the outer namespace. Others find
it a bit messy and harder to read. The choice is yours.
Creating Instances
We create instances of classes using the keyword new,
like this:
<script type=text/JavaScript>
var anInstance = new MyClass(42);
</script>
Which creates a new instance called anInstance.
Sending Messages
Sending messages in JavaScript is no different to our other
languages, we use the familiar dot notation.
<script type=text/JavaScript>
document.write("The attribute of anInstance is: <BR>");
anInstance.printIt();
</script>
Inheritance and Polymorphism
Unlike VBScript it is possible to use JavaScript's prototyping
mechanism to inherit from another class. It is rather more
complex than the Python technique but is not completely
unmanageable, but it is, in my experience, a relatively uncommon
technique among JavaScript programmers.
The key to inheritance in JavaScript is the prototype
keyword (we used it in passing in the code above). By using
prototype we can effectively add features to an object
after it has been defined. We can see this in action here:
<script type="text/javascript">
function Message(text){
this.text = text;
this.say = function(){
document.write(this.text + '<br>');
};
};
msg1 = new Message('This is the first');
msg1.say();
Message.prototype.shout = function(){
alert(this.text);
};
msg2 = new Message('This gets the new feature');
msg2.shout();
msg1.shout();
</script>
Note 1: We added the new alert method using
prototype after creating instance msg1 of the
class but the feature was available to the existing instance as
well as to the instance, msg2 created after the
addition. That is, the new feature gets added to all instances of
Message both existing and new.
This prototyping feature gives rise to the interesting
capability to change the behaviour of built-in JavaScript objects,
either adding new features or changing the way existing features
function! Use this capability with great care if you don't want
to spend your time grappling with really confusing bugs.
This use of prototype as a mechanism for adding
functionality to existing classes has the disadvantage that it
alters the existing instance behaviours and changes the original
class definition.
More conventional style inheritance is available too, as shown
below:
<script type="text/javascript">
function Parent(){
   this.name = 'Parent';
   this.basemethod = function(){
       alert('This is the parent');
       };
};

function Child(){
   this.parent = Parent;
   this.parent();
   this.submethod = function(){
       alert('This from the child');
       };
};

var aParent = new Parent();
var aChild = new Child();

aParent.basemethod();
aChild.submethod();
aChild.basemethod();

</script>
The key point to note here is that the Child object
has access to the basemethod without it being explicitly
granted, it has inherited it from the parent class by virtue of
the assignment/call pair of lines:
   this.parent = Parent;
   this.parent();
within the Child class definition. And thus we have
inherited the basemethod from the Parent
class!
The JavaScript Controversy
JavaScript has a rather bad reputation amongst the
programming fraternity, for lots of reasons. To give
one example: it is possible to try to create objects
without using the new keyword. JavaScript
allows you to do this without reporting any error
but the result is not what you would expect and usually
results in a very hard to find bug.
One of the reasons for this is that JavaScript does
not really have a class concept at all but "fakes it"
via the prototype mechanism. To get round some of the
issues, JavaScript programmers have developed some idioms
that produce much more robust code. Unfortunately the
explanation of them requires some advanced computer
science concepts that are beyond the scope of this tutorial.
If you are serious about using JavaScript for OOP you
should read the short book, "JavaScript the Good Parts", by
Douglas Crockford which explains why the techniques
above are not ideal and how to do it better.
We can, of course, use the same delegation trick we used with
VBScript. Here is the VBScript example translated into
JavaScript:
<script type=text/JavaScript>
function noReturn(){
this.parent.printIt();
};
function returnValue(){
return this.parent.getAttribute();
};
function newMethod(){
document.write("This is unique to the sub class<BR>");
};
function SubClass(){
this.parent = new MyClass(27);
this.aMethodWithNoReturnValue = noReturn;
this.aMethodWithReturnValue = returnValue;
this.aNewMethod = newMethod;
};
var inst, aValue;
inst = new SubClass();
document.write("The sub class value is:<BR>");
inst.aMethodWithNoReturnValue();
aValue = inst.aMethodWithReturnValue();
inst.aNewMethod();
document.write("aValue = " + aValue);
</script>
We will see classes and objects being used in the following
topics and case studies. It is not always obvious to a beginner
how this, apparently complex, construct can make programs easier
to write and understand but hopefully as you see classes being
used in real programs it will become clearer. One thing I would
like to say is that, for very small programs they do not really
help and almost certainly will make the program longer. However,
as your programs start to get bigger - over about 100 lines say -
then you will find that classes and objects really can help to keep
things organized and even reduce the amount of code you write.
If you are one of those who finds the whole OOP concept
confusing don't panic, many people have programmed for their
whole lives without ever creating a single class! On the other
hand, if you can get to grips with objects it does open up some
powerful new techniques.
Things to Remember
- Classes encapsulate data and function into a
single entity.
- Classes are like cookie cutters, used to create
instances, or objects.
- Objects communicate by sending each other
messages.
- When an object receives a message it executes a
corresponding method.
- Methods are functions stored as attributes of the
class.
- Classes can inherit methods and data from
other classes. This makes it easy to extend the
capabilities of a class without changing the
original.
- Polymorphism is the ability to send the same
message to several different types of object and each
behaves in its own particular way in response.
- Encapsulation, Polymorphism and Inheritance are all
properties of Object Oriented programming
languages.
- VBScript is called an Object Based language because
while it supports encapsulation, it does not fully support inheritance
and polymorphism.